How to Draw Whimsical Faces Step By Step
Estimated reading time: 15 minutes
Do you see other artists draw faces with such ease that you instantly envy them? If you’ve ever wondered how to draw whimsical faces, you are not alone; many artists aspire to add a playful touch to their portraits.
Do you want to draw beautiful whimsical faces, but just don’t know how?!
Today, I’m going to show you how to draw whimsical faces.
By whimsical I mean: no stressing about realism, no perfect symmetry, no judgment. Just fun. With this step-by-step guide I’ll help you go from blank page to a face you’re genuinely proud of — even if you’ve never drawn a face before.
First we’ll tackle each feature individually — eyes, nose, lips, eyebrows — then bring them all together using simple proportion guidelines.
With this step-by-step tutorial, I’ll try to help you start drawing female faces today.
If you’re only a beginner, I promise you you’ll be further down the road to drawing the faces you love.
How to draw whimsical female faces step by step
First, I’m going to show you how to draw each face feature individually and then we’ll see how to set face proportions and where to put facial features.
But mind you, at first, these faces will look all wonky, even strange. And you might ask yourself why you’re even listening to me.
However, every time I draw faces, they look like strange aliens until I start finishing them.
So, I just wanted to say: bear with me, they’ll be beautiful in the end.
GRAB YOUR FREE WHIMSICAL FACE PROPORTIONS GUIDE
This guide helps you draw regular female proportions as well as whimsical ones.

Supplies you’ll need
What You’ll Need
- Mechanical pencil.
- smooth paper (not textured)
- Eraser
- Waterproof black pen
- Colored Pencils (optional, so fun!)
- Watercolors for adding color later
I like drawing with a mechanical pencil and later tracing it with a waterproof black pen.
However, you can also use a colored pencil for drawing. I got this advice years ago and it’s also very fun.
As far as paper is concerned, don’t try your first drawings on textured paper.
You’ll just be frustrated because it’s hard to erase the pencil on this paper. Choose a smoother paper.
What is a Whimsical Face?
A whimsical face is an expressive, imaginative portrait that intentionally breaks realistic proportions in charming ways. Wide-set dreamy eyes, an oversized forehead for wild hair, a tiny button nose, rosy circle cheeks — these playful exaggerations are the whole point. The style is forgiving, beginner-friendly, and endlessly personal.
How to draw eyes
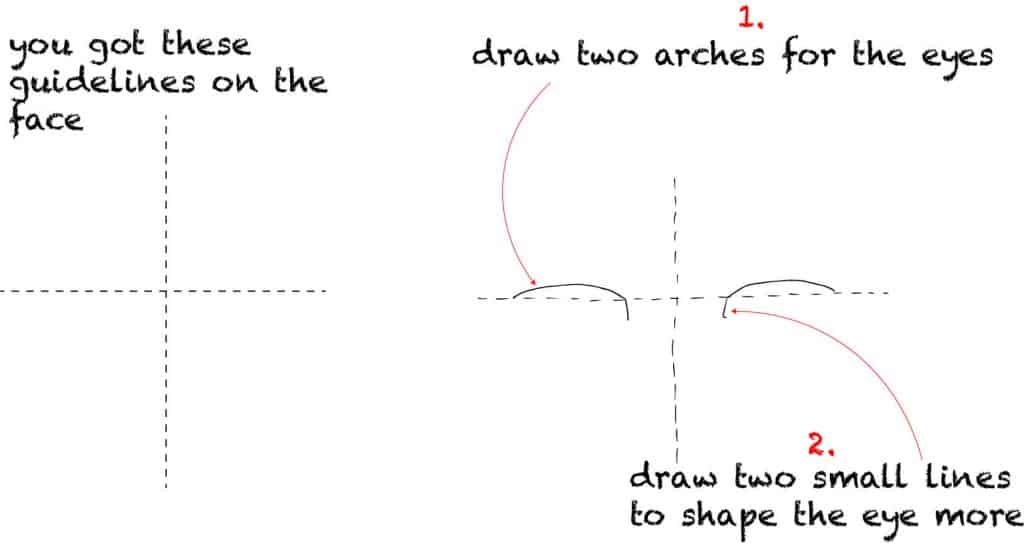
These dotted lines in the images below are a part of the face proportions guidelines we’ll use afterward.
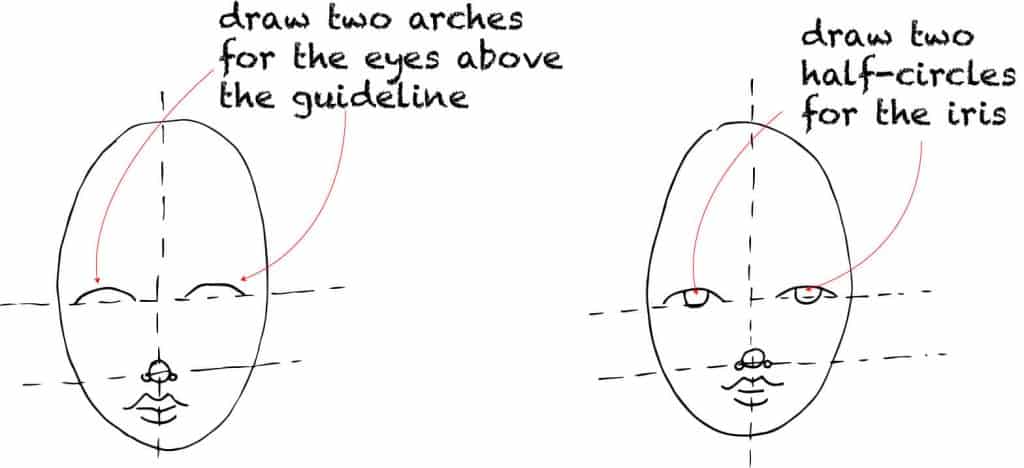
First, draw two arches above the guideline. The distance between the eyes should be the same as the eye length.
However, if you want to experiment, you could make that distance wider, and then you’ll truly get the whimiscalest face.
After you’ve drawn the arches, also draw two lines as in the photo below, to give the eyes some shape for now.
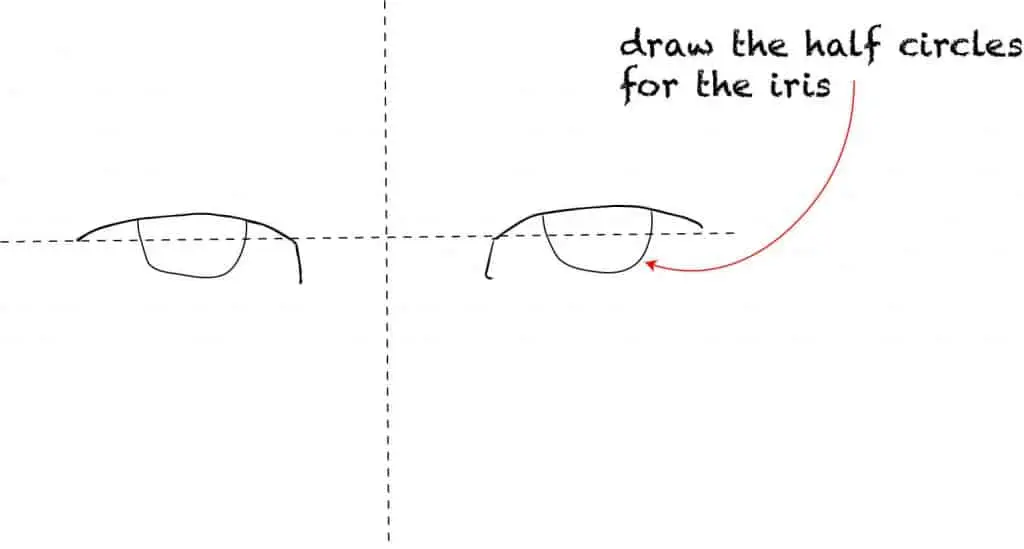
Then add a half-circle for the iris.
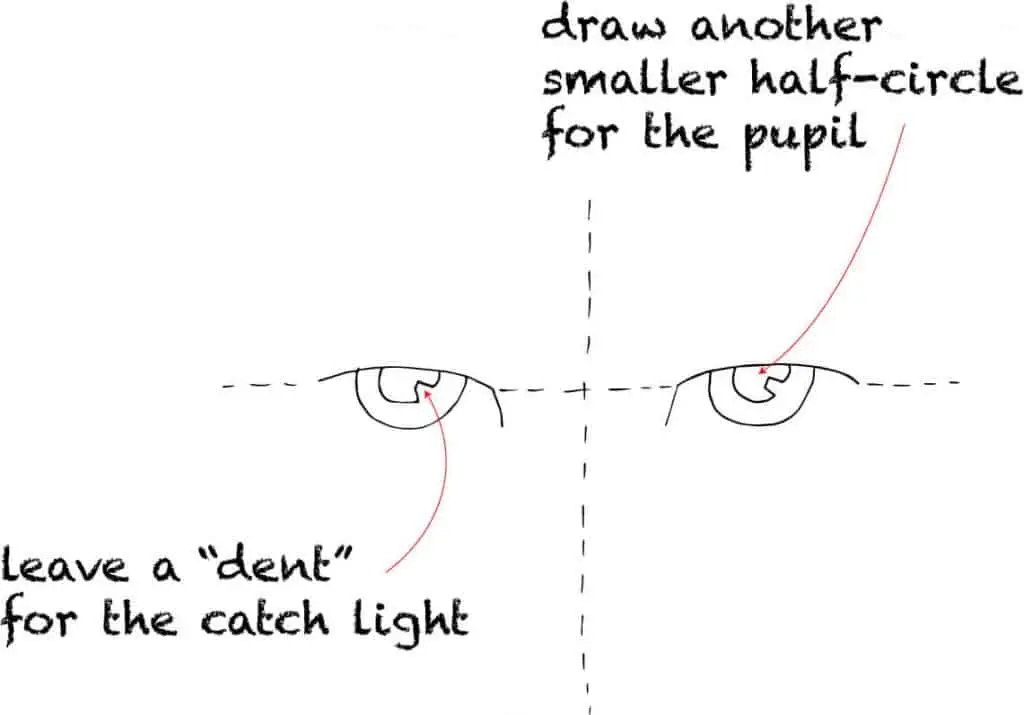
Draw another, smaller half-circle for the pupil and leave a small rectangle shape for the catchlight.
That’s what gives the eye glow and depth.
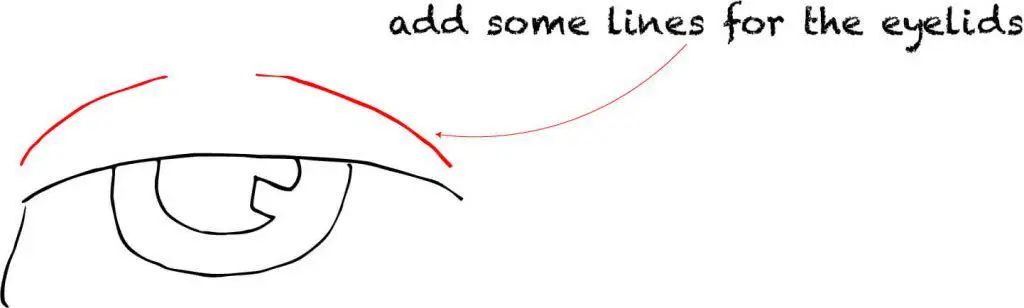
In the end, add just two lines for the eyelids. This gives the eyes more dimension.
How to draw a simple nose
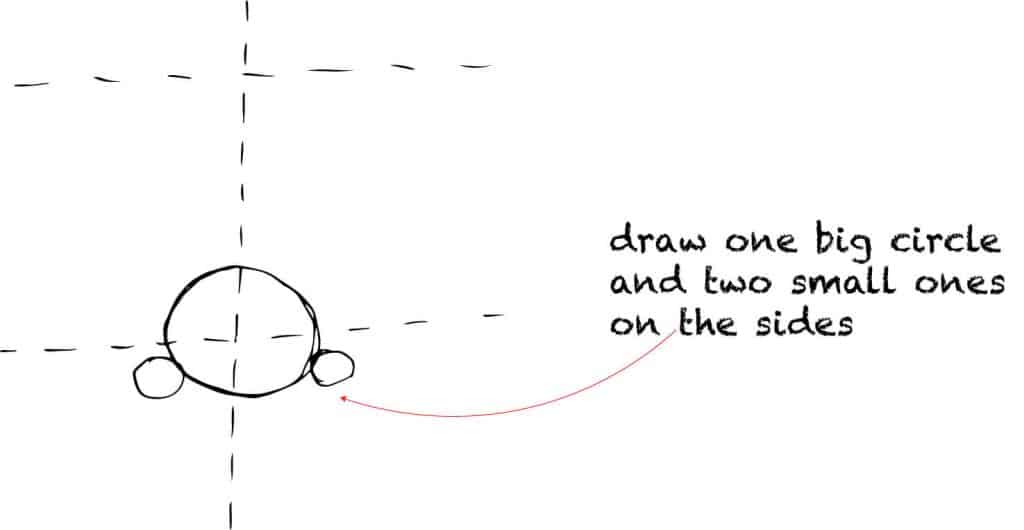
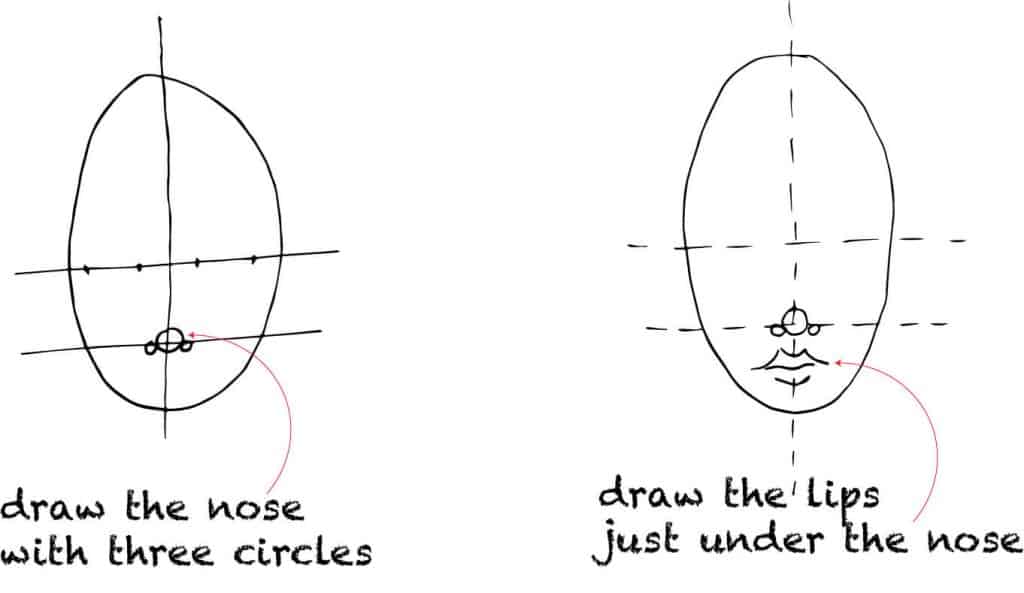
All you need are three circles!
Draw one big circle and two smaller ones on each side.
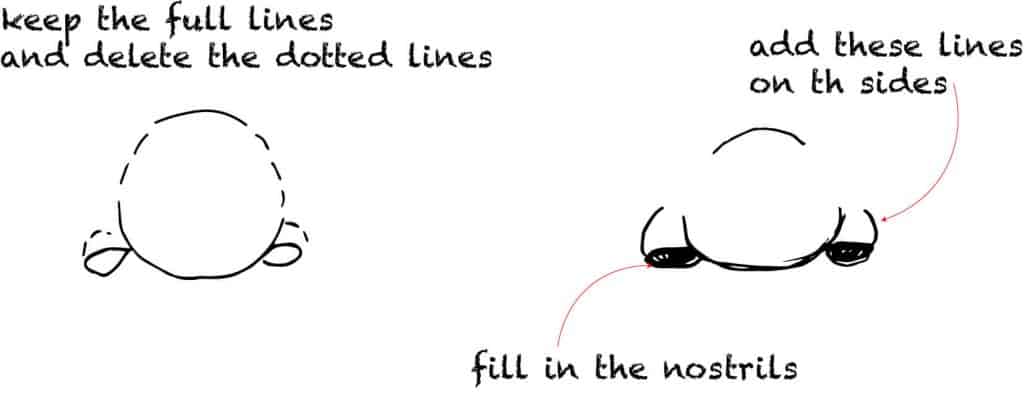
Now, let’s make the nostrils, add shape, and delete some extra lines.
Draw two nostrils in the small circles and fill them in.
Add the curvy lines on the nostrils and leave the small arch on the top of the nose.
The nose is usually wide as the distance between the eyes.
How to draw lips
To draw the lips you only need a few lines.
Just remember, the curvier the lines, the more natural and soft the lips look.
I got this advice long ago from Jane Davenport, and it never fails me.
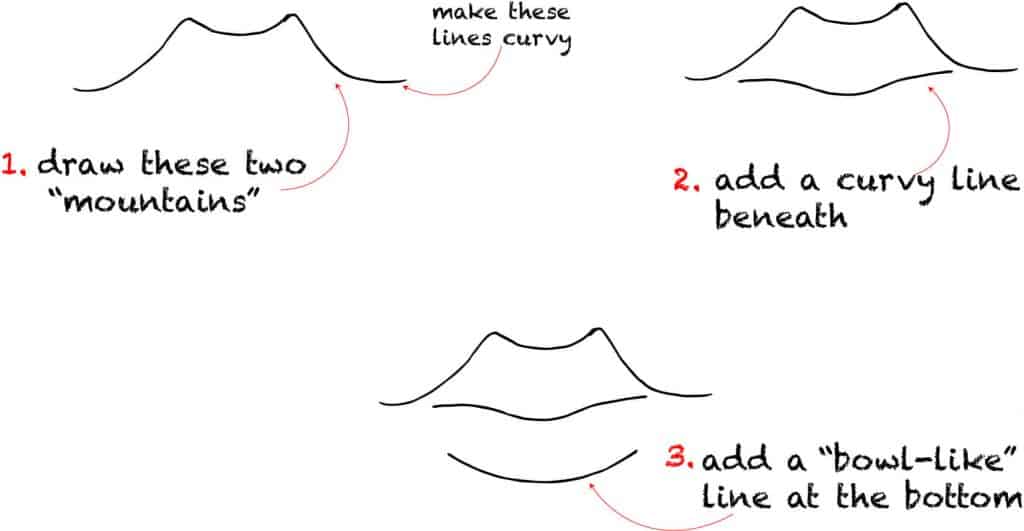
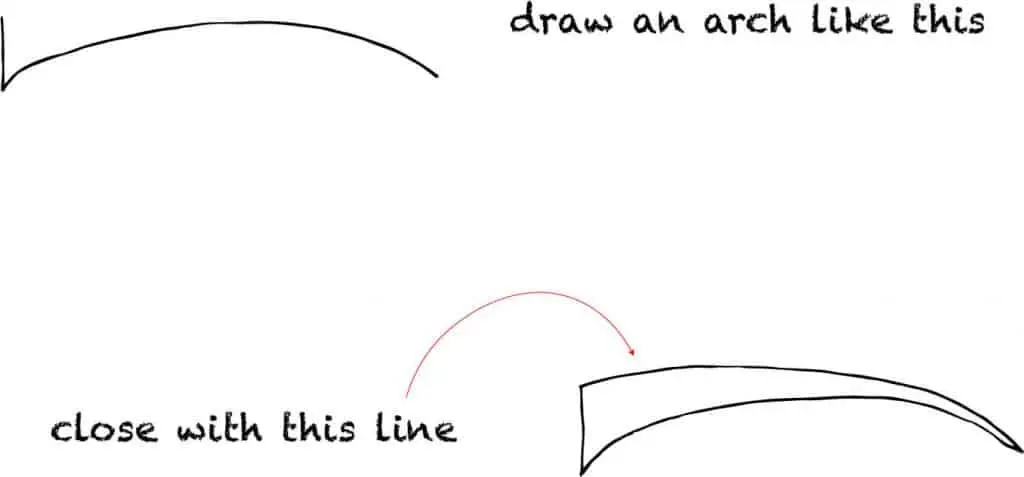
First, draw two mountains like in the image below.
Then, add a curvy line for the valley beneath the mountains.
Finally, draw the third line in a bowl-like shape below the valley line.
You don’t have to connect the lines. I find them really interesting when they’re drawn like this. They’re more sketch-like.
How to draw eyebrows
You can experiment with eyebrows and have so much fun with them.
They can be straight or curvy, thick or just thin lines.
For me, the simplest way to draw them is like this.
Draw one curved line, and just add another and connect them at the ends, just like in the photo below.
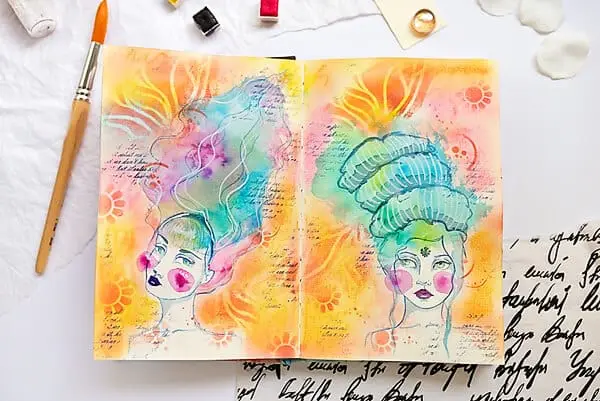
How to draw hair
This is one of my favorite parts of whimsy faces.
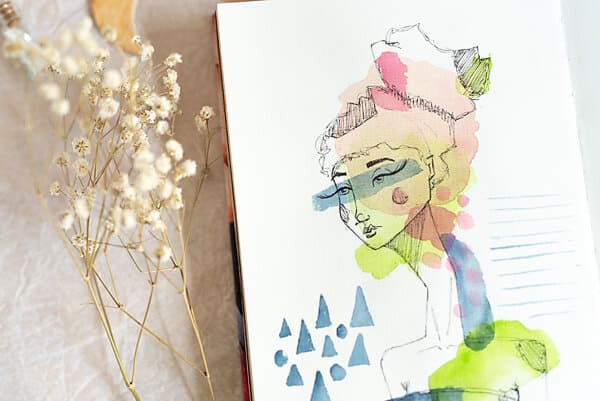
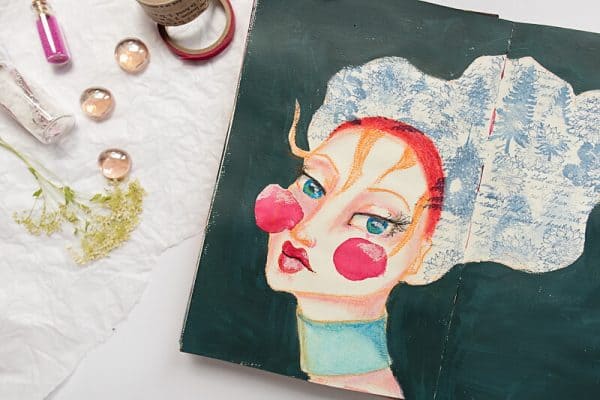
I didn’t prepare a drawing tutorial for the hair, I’ll just show you some of my drawings so you can see how you can experiment with hair.
Just a quick note. If you want your hair to show movement, then add long, curvy lines in an upward direction, or to the sides.
How to draw eyelashes
These can be tough to draw.
But I add the whimsy by just drawing a few curvy lines where the eyes close.
Do you see that in the photo below? Yes, I love to make them long and curvy.
You can experiment with them, too. Make them so long that they become the focus of the face if you want to.
Draw cheeks!
I don’t know why, but drawing cheeks is so satisfying and they turn out cute no matter what color or shape.
If you want to add a whimsical spark, make your cheeks visible by drawing circles for the cheeks.
Also, experiment with the size. I love my cheeks to even be outside the face lines.
Face proportions
When it comes to face proportions, think of symmetry and lines. We’re going to use them to draw a face.
I always begin with drawing an oval shape. It’s just a sketch and don’t worry too much to be precise.
This oval shape represents the whole head, not just the face.
Face symmetry
Do you worry about face symmetry? Well, don’t.
A perfectly symmetrical face is not natural and looks odd.
So, don’t worry if somehow your eyes aren’t exactly the same size or the exact same shape.
Your drawings will be more interesting and appealing if you don’t look for this perfect symmetry.
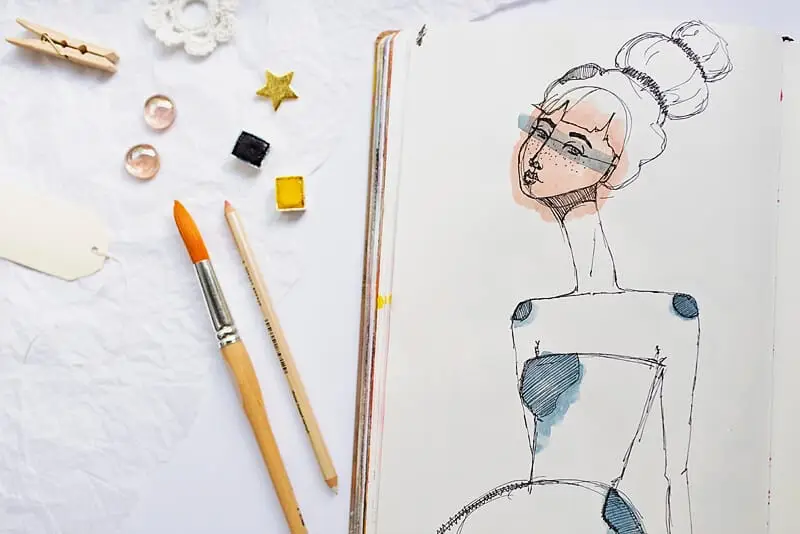
You’ll see in my drawings below that I don’t care about that.
Drawing a face like this is actually sketching, we’re just setting some guidelines and framing the face.
Later on, after you’re done drawing, you can shade and paint the face any way you like, and give it more interest and dimension.
Draw the guidelines
When you draw the oval, split it in half with a horizontal line and then again with a vertical line.
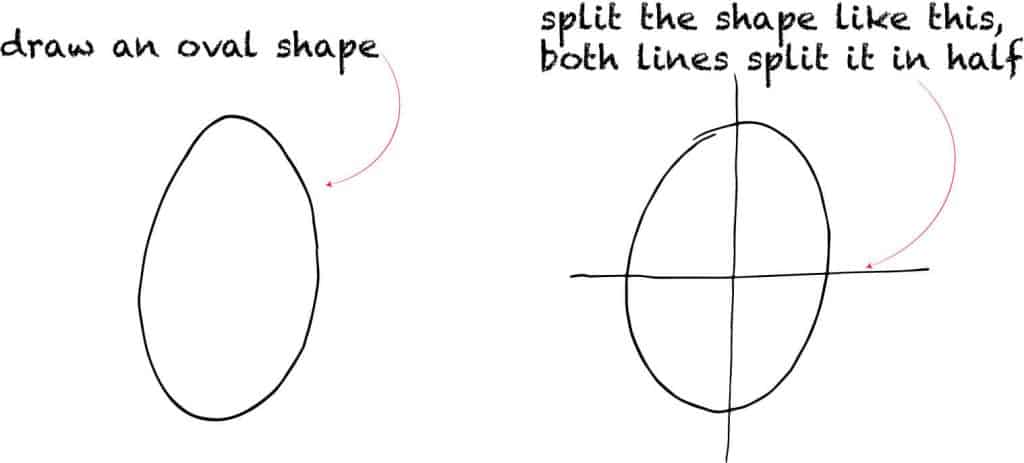
These lines will help you place the eyes, nose, ears, and mouth.
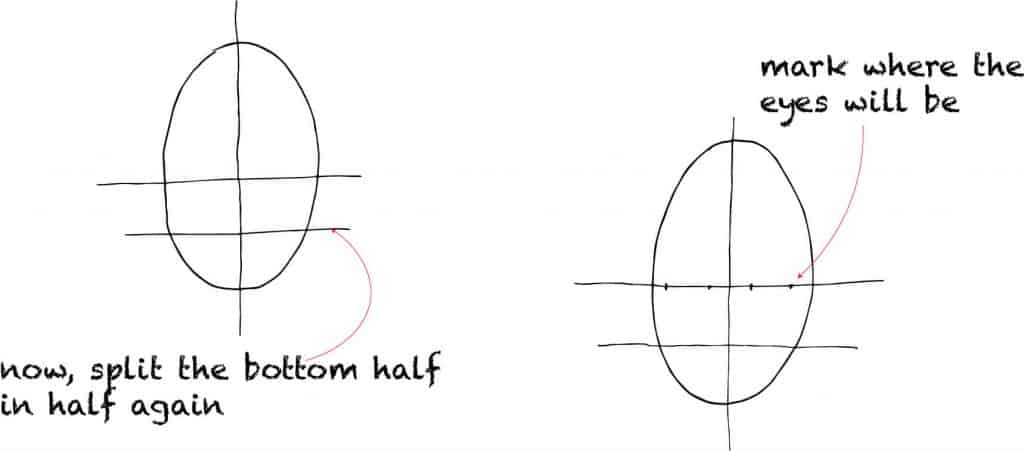
Next, split the bottom half once again in half, with a new horizontal line.
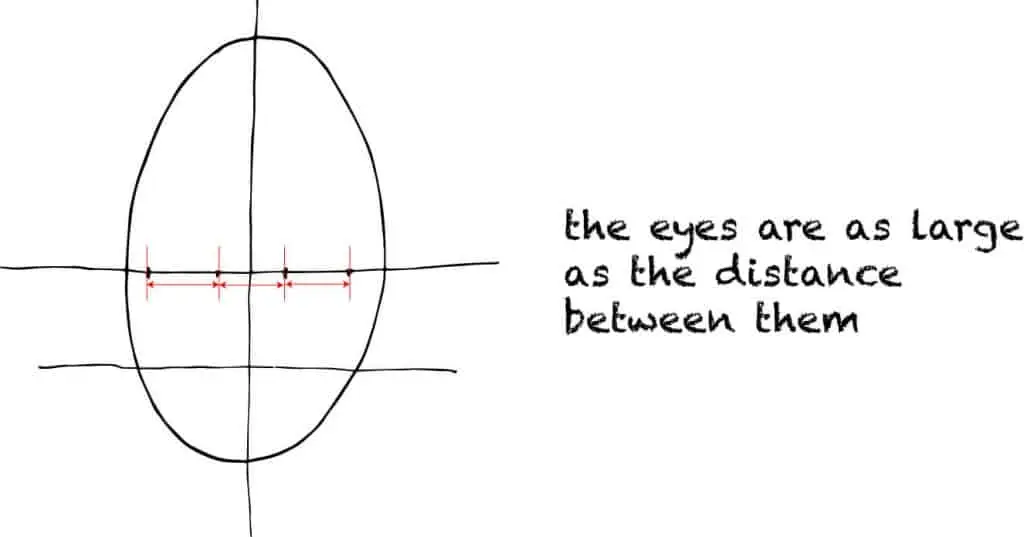
The eyes will rest on the central horizontal line, so mark where you’ll put them.
You’ll want the distance between the eyes to be the same length as the eye.
Draw the face features
The nose will be on the intersection between the bottom horizontal line and the vertical line. The lips go right under the nose.
For the eyes, draw two arches above the guideline and add the iris for each eye.
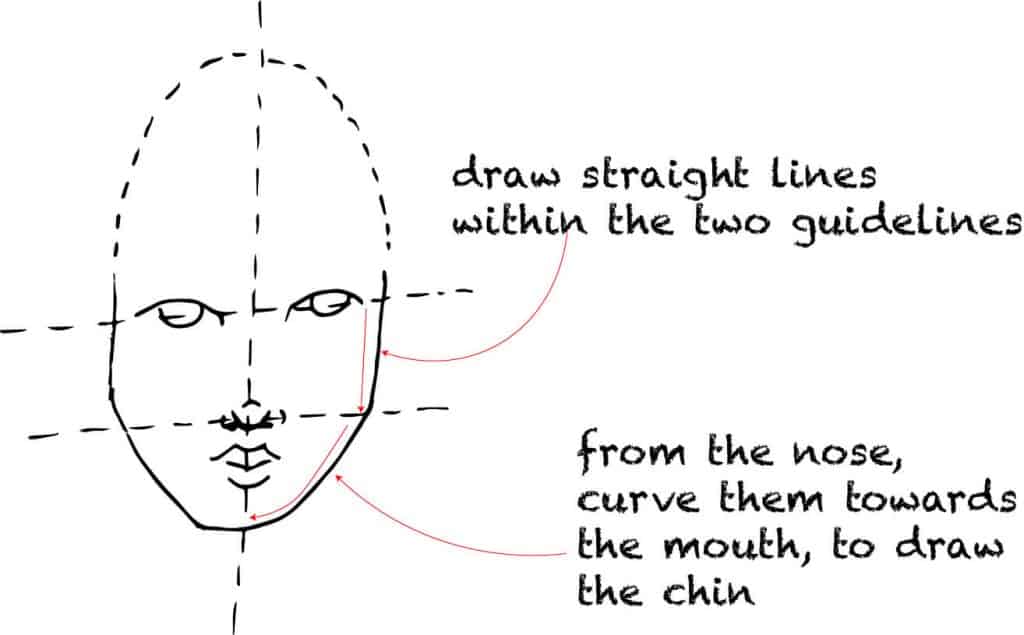
When you’ve drawn all the features, start drawing the face line.
In the face proportions guidelines, start the face from the eyes by drawing straight lines downwards until the nose line.
From there, start curving it towards the lips and end with the chin under the lips.
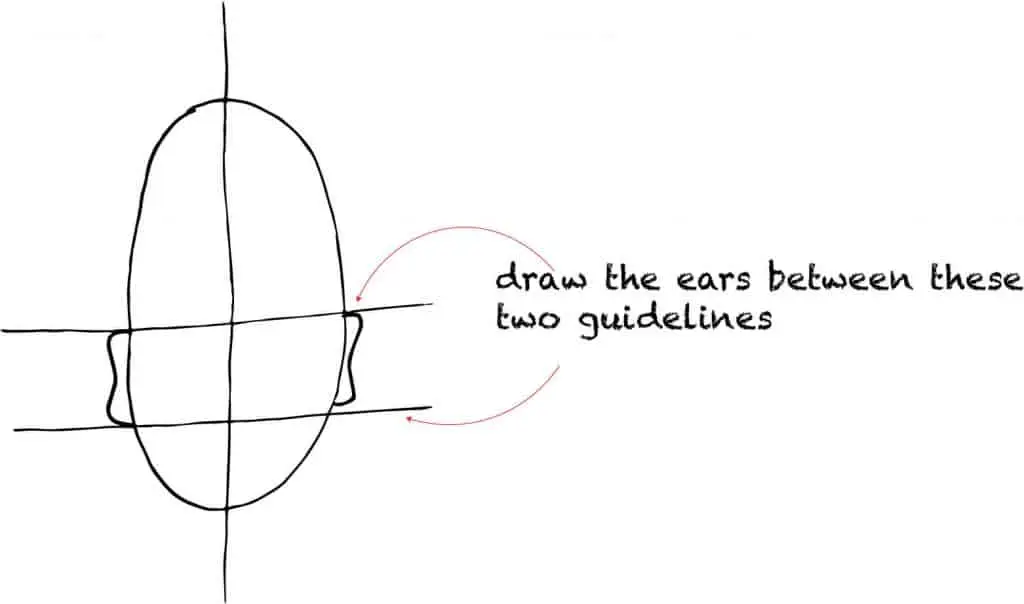
I usually add ears the last, and I make them super simple.
Draw them between the eyes and the bottom of the nose. Let the guidelines help you.
I don’t worry about the exact shape or symmetry. There’s no joy in stressing over that.
Let me show you what these guidelines look like on a finished whimsical face.
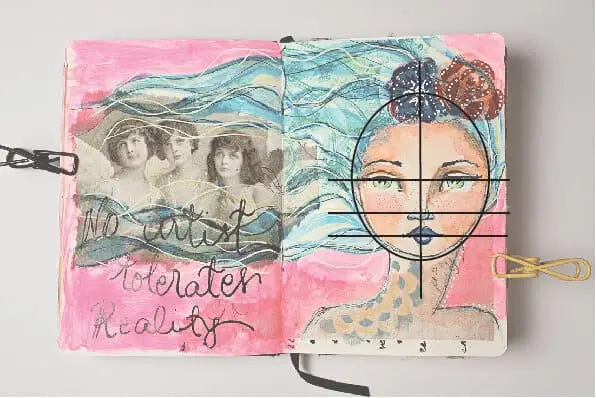
Can you see how I placed all the face features along these face proportions guidelines?
Experiment with different face shapes
I usually start my faces with an oval shape.
But you can experiment with the shapes and add your own touch to it.
For example, you can draw a circle or even a rectangle of some kind.
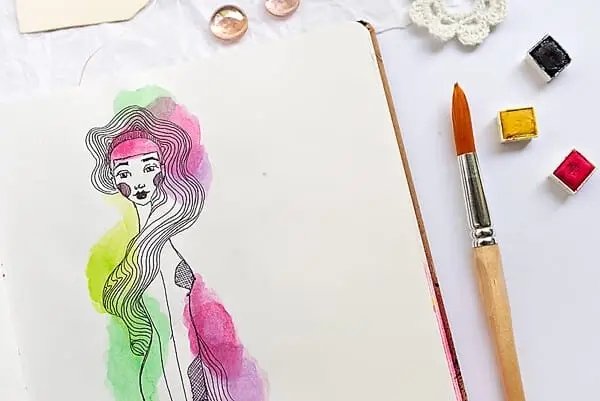
I sometimes love making my girls’ faces with stronger features rather than making them soft.
Experiment with size and distance
This is another way to add interest and make your faces unique.
The wider the distance between the eyes, the more whimsical the face looks.
Also, the bigger the eyes, the more whimsy you add to them. Here, you can play with the details in the iris, such as catchlights and color.
Another cool idea is to make the lips too small or too big for the face.
You’ll end up with interesting-looking faces, and maaaan, what fun you’ll have.
Ready To go Deeper?
Whimsical Faces Workshop
Want me to walk you through every single step — with video, feedback, and a supportive community of fellow beginners? My Whimsical Faces Workshop covers everything in this tutorial and so much more.
FAQ for Whimsical Faces Drawing
1. How do I draw symmetrical faces if I’m a beginner?
Use light guidelines, but embrace loose symmetry — whimsical style is intentionally imperfect.
2. Why do my eyes never match?
This is normal. Practice eyes separately. Also tilt them slightly for a cute whimsical look.
3. What are the best pencils for drawing whimsical faces?
A simple mechanical pencil is perfect for thin, consistent lines.
4. How do I make my faces look more whimsical?
Try wider-set eyes, oversized cheeks, curvy lines, or tiny noses.
5. Can beginners really draw whimsical faces?
Absolutely. The style is forgiving, playful, and designed for beginners.
6. Do I need to understand realistic proportions first?
No — this tutorial teaches simple proportions that are intentionally flexible.
7. How do I add color without ruining the drawing?
Use light watercolor washes or colored pencils at the end.
8. How long does it take to improve?
With just 10–15 minutes a day, you’ll see progress in a week.
Final tips
First of all, I want you to forget about perfectionism.
There’s no perfect symmetry on our faces, and you’ll draw prettier faces if you just let go of expecting the perfect-plastic-surgery kind of face.
Secondly, use curvy lines for the lips and the hair. Then you’ll get a soft, feminine look.
Thirdly, experiment with the size of the facial features and the distance between the eyes.
Also, make some crazy flying hair to spice things up a bit.
Then, add cheeks: big cheeks, small cheeks, round ones, square ones – the possibilities are endless.
And finally, have some fun. If you set off to draw whimsical female faces, then don’t pressure yourself with realistic results.
Let your imagination flow and see where that takes you.
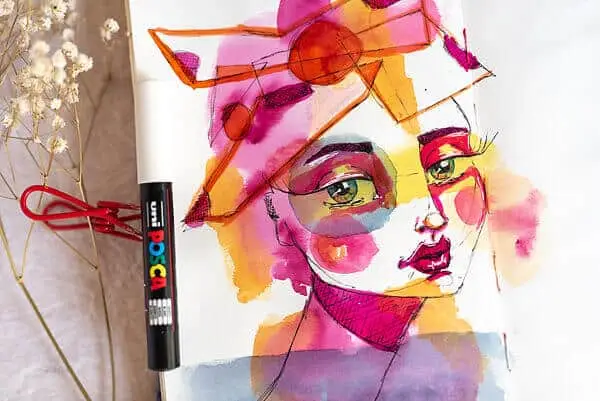
Once you’ve drawn your whimsical face, take it to the next level and paint the face you just drew with acrylic markers using a beginner-friendly complementary color method.
If this blog sparked your creativity, just wait until you dive into the Whimsical Faces Workshop. It’s simple, joyful, beginner-friendly, and loaded with rich info and exciting bonuses to make drawing feel easy and fun.
GRAB MY FREE WHIMSICAL FACE PROPORTIONS GUIDE
You’ll get both, regular face proportions, as well as whimsical ones so you can start drawing wonderful ladies today!