How to Draw Whimsical Faces for Every Season: A Step-by-Step Guide for Winter, Spring, Summer & Fall
If you love drawing whimsical faces but feel stuck always doing the same look, this tutorial is going to feel like a fresh cup of inspiration. In this guide on how to draw whimsical faces for every season: step-by-step guide, we’ll start with a simple, beginner-friendly way to draw a whimsical face, and then transform it into four different seasonal projects: winter, spring, summer, and fall.
You’ll learn how to:
1-Draw a whimsical face step by step
2-Choose color schemes that match each season
3-Add details such as decorative patterns
4-Create depth by playing with the background and adding mixed media to make your pages richer and more layered
Whether you’re working in your art journal, on loose watercolor paper, or on canvas, these ideas will help you develop your own seasonal whimsical style.
What Are Whimsical Faces? Understanding This Popular Art Style
If you’ve been drawing whimsical faces you defiantly know the joy of drawing these forgiving faces. If you are new to whimsical Faces you are in for a treat.
Whimsical faces are expressive, imaginative portraits that blend simple features with decorative elements, patterns, and seasonal themes.
Unlike realistic portraiture, whimsical face drawing emphasizes:
1- Simplified facial features with expressive eyes
2- Decorative patterns and embellishments
3- Mixed media techniques combining watercolor, ink, and pattern work
This art style is perfect for beginners because it removes the pressure of perfection and celebrates creative freedom.

Why Draw Seasonal Whimsical Faces in Your Art Journal?
Drawing whimsical faces becomes more than a playful exercise, it becomes a way to feel and follow your emotional rhythm through the seasons.
1-Track emotional shifts throughout the year
2- Practice color theory naturally through seasonal palettes
3- Build a consistent art practice with fresh inspiration
4- Develop your unique artistic style over time
5- Create meaningful pages that tell your creative story
Each season brings distinct colors, moods, and natural symbols it is defiantly a perfect inspiration for your whimsical character art.
Essential Supplies for Drawing Whimsical Faces
Before we dive into the fun part, gather these art supplies:
Minimal Supply List:
Grabie 50 colors Watercolor Paint Set
Posca Paint Pen (white and Black)
Pencil for light sketching
Eraser
Optional: Gold or metallic gel pens for decorative details
(Some of these links are affiliate links, which means that if you purchase something through the links, I get a small commission, at no extra cost to you.)
Pro Tip: You don’t need expensive supplies to create beautiful whimsical faces. Start with what you have and build your collection of art supplies gradually.
Your Foundation – How to Draw a Simple Whimsical Face (Step-by-Step)
Before we dress our character in the colors of the seasons, let’s build a solid, reusable foundation. This basic face structure is your template for endless creativity.
I highly recommend you go to How To Draw Whimsical Faces Step By Step . It is a very simple, step-by-step guide on how to draw the whimsical faces easily.
Materials You’ll Need:
A pencil (2H or HB is great for light sketching)
Good quality paper (mixed media or smooth watercolor paper works well)
An eraser
Fine-liner pen (optional, for inking)
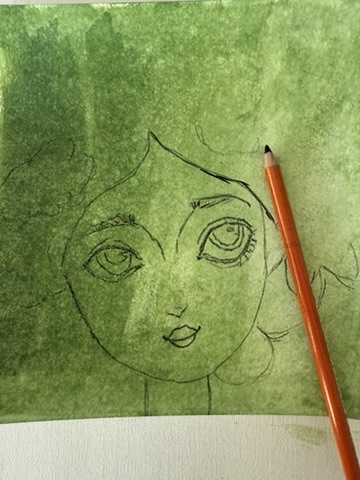
Step 1: The Head
Sketch the Head Shape Lightly sketch a soft oval or egg shape. Make it slightly wider at the top than the bottom. This shape gives you plenty of room for expressive hair and facial features, which is key to the whimsical style.
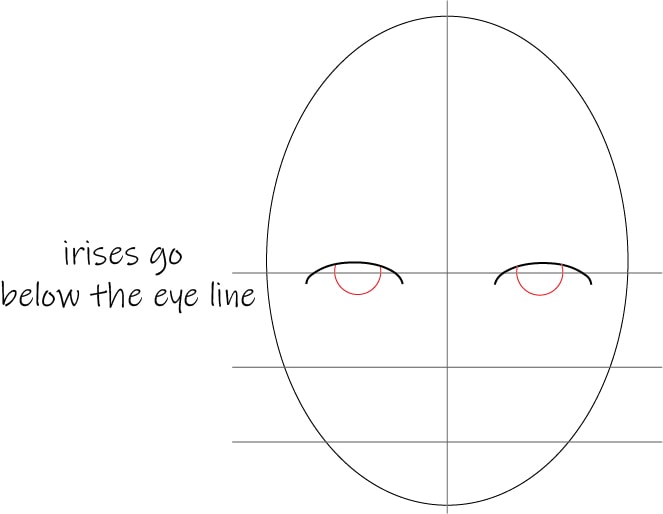
Step 2: Face Guidelines
Add simple guidelines these are the backbone of the whimsical face. They are the secret to keeping your face balanced.
Draw a soft vertical line down the center of the face.
Add a horizontal line halfway down for the eyes.
Place another line halfway between the eye line and the chin for the nose.
Add a final line slightly below the nose line for the mouth.
Pro Tip: Keep these lines faint! They are just a map you’ll erase later.

Step 3: the Eyes
Draw Expressive, Whimsical Eyes The eyes are the soul of your character.
On the eye line, draw two simple almond shapes or soft rounded rectangles. Inside each eye, draw a circle for the iris, ensuring a part of it is touched by the top lid for a natural look.
Add a smaller circle for the pupil.
Don’t forget: Leave a tiny white dot as a highlight to make the eyes sparkle with life.
Step 4: the Nose, Lips and Ears
Whimsical art thrives on simplicity so go for simple over complicated.
for the nose all you need is a tiny, soft tilted “C” shape or two small dots to show the nose nostrils. It’s that simple!
To draw the lips start by drawing a soft “M” shape for the top lip and a wider, curved line for the bottom lip, asymmetry is charming!
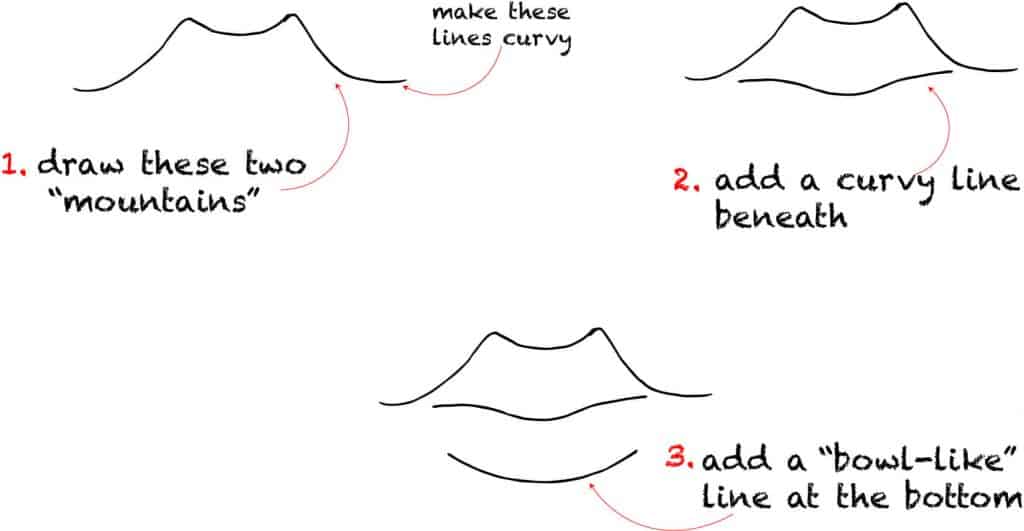
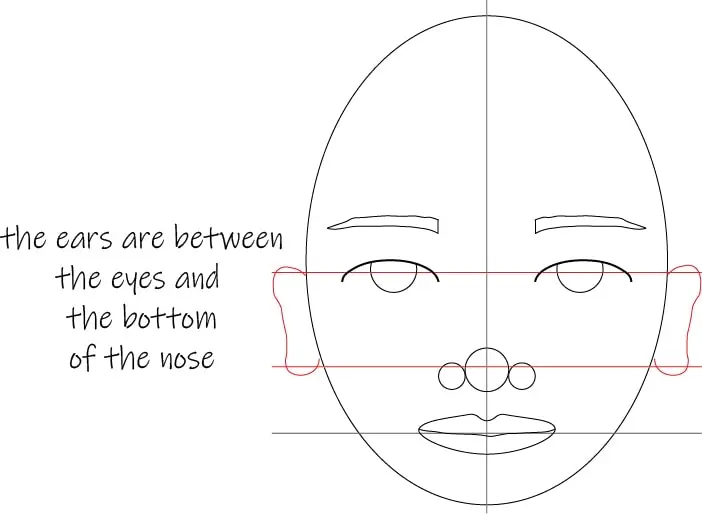
Ears are usually placed between the eye line and the nose line. Draw them as simple as you can.
Step 5: Hairline and Eyebrows
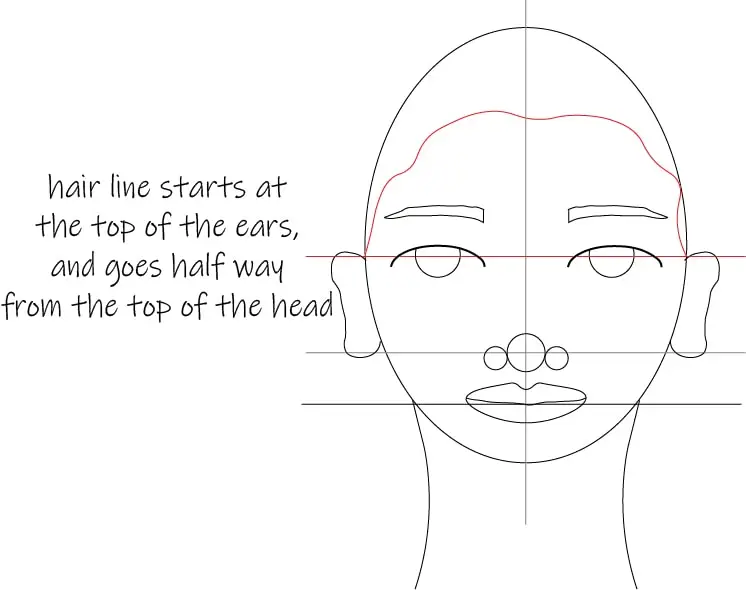
Sketching the eyebrows will frame the eyes. So start by sketching gentle arches slightly above the eye line. Then, lightly mark where the hairline starts, typically about halfway between the eye line and the top of the head.
Step 6: Hair
Create Flowy, Dramatic Hair simply think of the hair as a main character, not an accessory. Use big, flowing shapes that wrap around the head like water, smoke, or fabric. Avoid drawing individual strands; focus on the larger forms.
Step 7: Final Touches
Refine your lines by decide your inking style. You can:
Go over your final pencil lines with a fine-liner pen for a defined, illustrative look Or erase the pencil and go straight in with paint, letting the color define the features for a softer, more ethereal feel.
Congratulations! You now have a versatile, whimsical face ready for any seasonal makeover.
GRAB YOUR FREE WHIMSICAL FACE PROPORTIONS GUIDE
This guide helps you draw regular female proportions as well as whimsical ones.

Whimsical Face and Seasons
Hooray! Your whimsical crew is waiting for their personalities. Ready for the next adventure?
Path One: The Intuitive Explorer! Follow your creative compass and see where it takes you. It’s a glorious journey of pure play!
Path Two: The Confident Creator! Prefer a friendly map to guide you? Excellent! Let me share my favorite recipe for whimsical charm, so you can mix, match, and create with confidence.
Whichever path you pick, you’re about to make something wonderful!
Let’s set the Mood
Ready to map out your beautiful art? Let’s start with the most important question: What’s the VIBE? For Example let’s take the Snowlight Storyteller Whimsical face
Is your scene a cozy winter wonderland like all soft, quiet, and frosted in blues? Or is it a festive holiday party, bursting with cheerful reds and sparkling golds?
Once you’ve got the feeling, let’s play with color! What’s your dream team? A cool crew of icy silvers and powdery blues? Or a warm squad of cinnamon and chestnut? This is your world!
you’re the boss of the palette!
The Magical recipe for these Whimsical Seasonal Faces are:
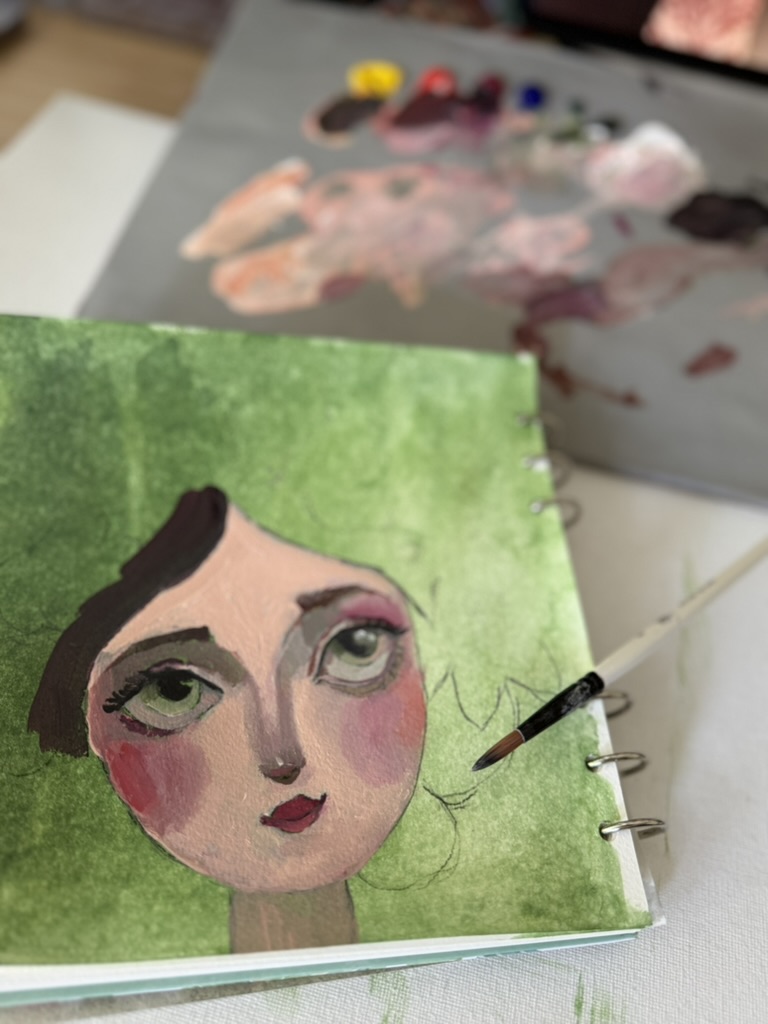
Step 1: Once you decided on the mood and color combination Start with the background. Fill the page of the canvas with one or two colors make them very light almost like a wash.
Step 2: Sketch the face by drawing the Basic Shape Lightly draw an oval or circle for the head. Don’t worry about perfection remember whimsical faces celebrate imperfection.
Step 3: Add Simple Features
Draw two large, expressive eyes (circles or ovals)
Add a small nose (simple line or dot)
Create a gentle smile or neutral expression
Step 4: Design the Hair Let the hair flow freely. This is where you’ll add seasonal
elements like flowers, leaves, or snowflakes.
Step 5: Add Seasonal Details Incorporate the season’s colors and symbols into hair,
clothing, or background.
Step 6: Layer Decorative Patterns Use Klimt-inspired patterns: spirals, dots, geometric shapes, or repeating motifs.

Step 7: Define with Ink Once dry, outline key features with a fine-line pen for definition.
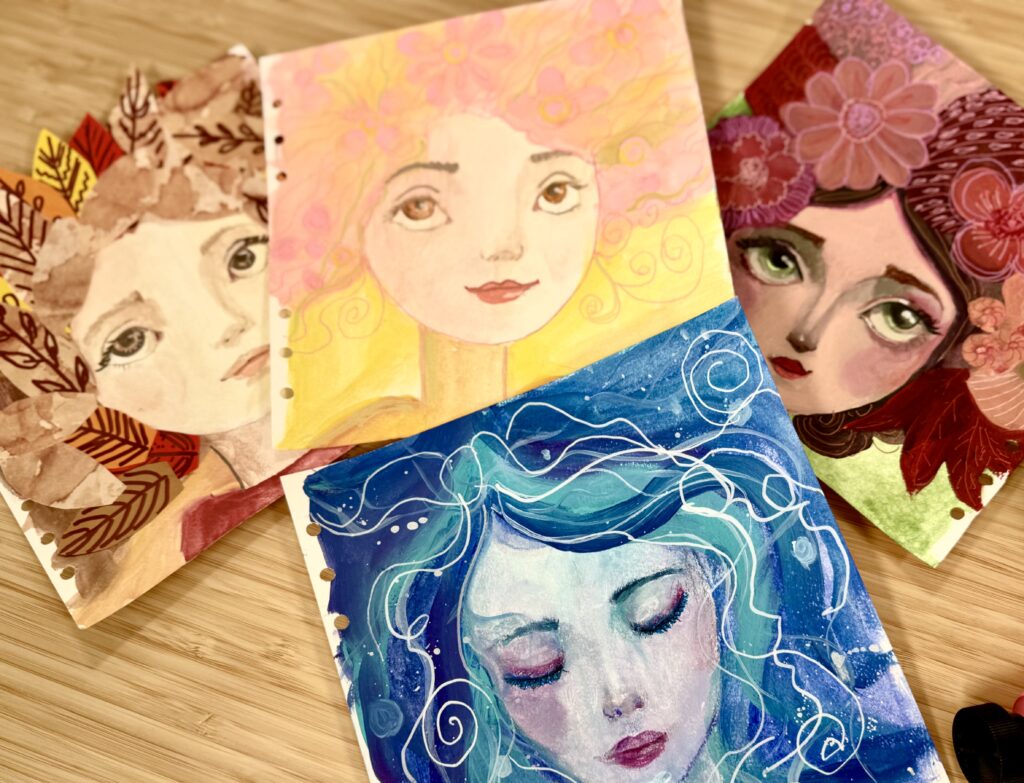
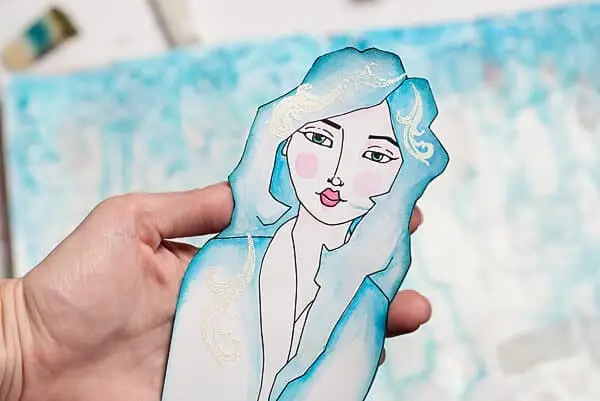
The Snowlight Storyteller
Ready to capture the quiet magic of winter? This project is all about that cold night and the feeling, you know, the one you get when you’re wrapped in a soft blanket, watching snowflakes dance outside the window. It’s a season of twinkling lights, hot cocoa, and starry nights.
We’re going to create a “Snow Storyteller,” a whimsical face that holds all the wonder of the season. We’ll play with cool, icy shades and warm, glowing accents, and give her a hairstyle as soft as freshly fallen snow.
So, grab your favorite blues and white, and let’s make a character as enchanting as a frosty morning. Get ready to create some winter magic!

Mood & Color Palette
I will choose one example to create and guide you through but you can apply these steps to any mood or color
Mood: Quiet, magical, serene.
Color Combination: Icy blue, lavender, dark blue, soft taupe, and pops of white

Step-by-Step Project Guide
- Build the Winter Scene: Add a faint, blended wash of blue in the background.
2. Start with Your Base Face: Use your foundational sketch.
3. Create Cool Skin Tones: Using heavily diluted watercolors, wash the face with a pale peach base. Then, add soft shadows around the eyes, cheeks, and jawline using mixes of lavender and icy blue. This creates a cool, wintery complexion.
4. Paint a “Snowstorm” Hair: Paint the hair in washes of soft dark-blue, blue and taupe. While the paint is still slightly damp, drop in a bit of clean water to create “bleeds” and soft edges, mimicking a blurry snowstorm. Once dry, use a fine brush or white gel pen to add tiny dots and star shapes to suggest falling snow within the hair.
5. Add Klimt-Inspired Decor: Using a white paint pen or metallic watercolor, decorate the hair with repeating patterns inspired by Gustav Klimt—think spirals, or cilrcles.
7. Final Highlights: Use a white gel pen to add the brightest sparks in the eyes, a dot on the nose, and a highlight on the lower lip.
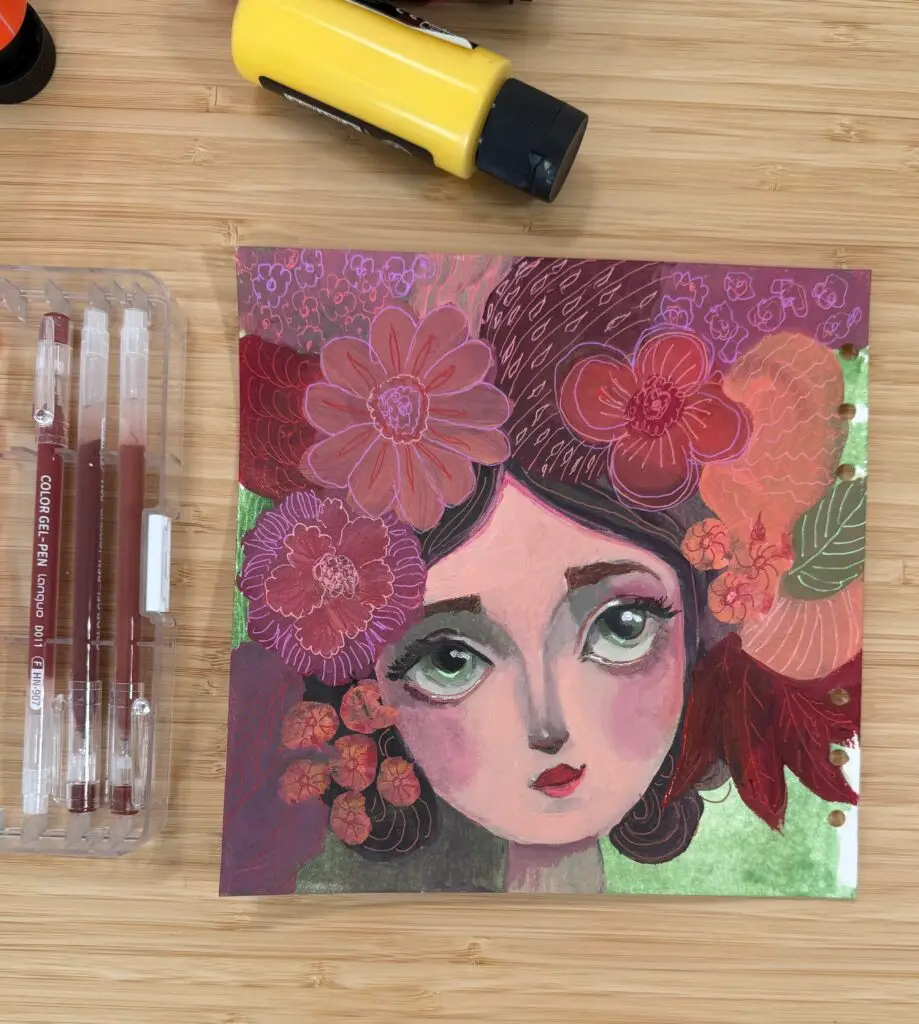
Spring Whimsical Face The Blooming Dreamer
Are you ready to welcome spring right in your Art journal? This project is all about capturing that feeling when the world wakes up from its winter nap and when the air is soft, the first brave flowers are peeking out, and everything feels fresh with possibility.
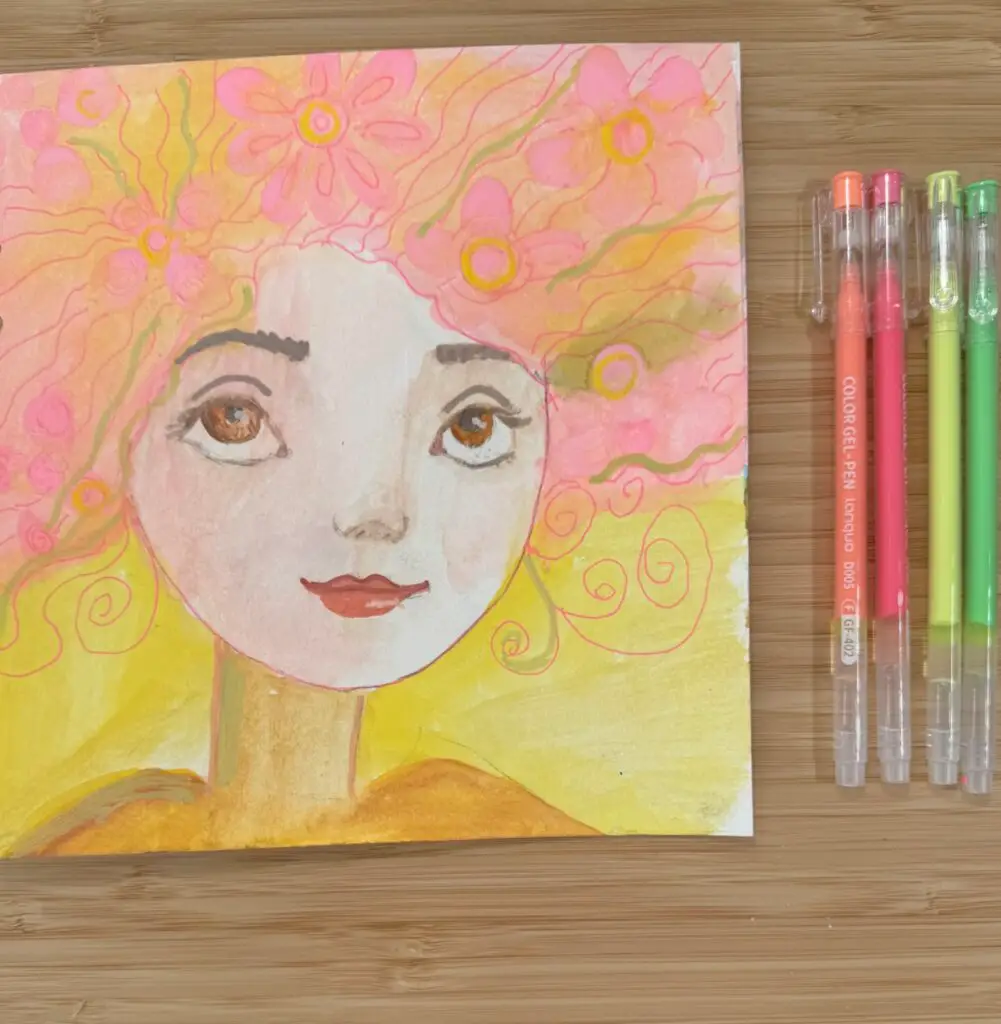
We’re going to create a “Blooming Dreamer,” a whimsical face that’s as gentle and hopeful as a spring morning. We’ll play with the softest pastels, weave flowers into her hair, and even add a little magical, vines (inspired by the legendary artist Gustav Klimt!).
So, grab your brushes and your favorite springy colors and let’s make some magic together.
The Blooming Dreamer
Mood & Color Palette
Mood: Fresh, hopeful, gentle, renewing.
Color Scheme: pink, light green and yellow
Step-by-Step Guide
- Suggest a Spring Background: Use a large, clean brush to add a very light wash of light yellow in the background.
2. Begin with a Light Sketch: Keep your pencil lines very light or sketch directly with a light wash of brown or grey watercolor.
3. Apply Soft Pastel Skin Tones: Use washes of light peach and blush pink on the cheeks, nose, and eyelids. Embrace “watercolor blooms” those happy accidents where colors bleed so it will add a soft, organic texture.
4. Weave a Floral Crown into the Hair: Transform the hair into a garden. Paint the base hair color in sage or mint, and then use a brush to add flowers in pink add twisting vines and small leaves.
5. Incorporate Klimt’s vines: Add vines and swirls like Klimt
6. Refine with Gentle Lines: Instead of a harsh black pen, use a colored pencil or a fine-tip pen in grey or brown to gently redefine a few key lines—the eyelashes, the outline of the lips, and a few strands of hair. This keeps the entire piece soft and dreamy. If you’d rather paint your seasonal whimsical face, try this acrylic marker portrait tutorial for beginners.
Summer Whimsical Face The Sunlit Wildheart
Are you ready to bottle up all the joy of summer? This project is for those long, lazy days of feeling the sun on your skin, the sound of crashing waves, and the vibrant energy of a garden in full bloom.
We’re going to create a “Sunny Daydreamer,” a whimsical face bursting with warmth and happiness. We’ll use a palette of juicy, bright colors and give her a crown of wildflowers tucked into her hair.
So, grab your most vibrant yellows, corals, and greens! Let’s chase the sun together and create a character that’s basically a vacation for your art journal.
Mood & Color Palette
Mood: Bold, bright, vibrant, confident, and full of life.
Color Scheme: Warm yellow, coral, tangerine, green, and copper.
Step-by-Step Guide
1. In the background, create bold sections of color a soft green background.
2-Adjust the Base Expression: Use your foundational face, but tilt the chin up slightly or curve the lips into a confident smile to convey a summer vibe.
3. Create a Sun-Kissed Skin Glow: Build the skin tones with warm peach, coral, and a touch of golden yellow. Concentrate the warmest tones on the forehead, nose, and cheeks, as if she’s been basking in the sun.
4. Paint Sun-Soaked Hair: Paint the hair in rich, warm tones like golden yellow, copper, or chestnut brown. While the base is wet, add streaks of even brighter yellow or tangerine to create sun-bleached highlights.
5. Add Summer Symbols: Have fun! Add tiny sunglasses, or incorporate motifs like citrus slices, abstract waves, or sun rays emanating from her hair. I added flowers and leaves.
6. Amplify the Contrast: Go darker around the eyes to make them pop. Use a dark brown or black pen to intensify the lashes and pupils. This strong contrast enhances the vibrant, lively feeling.
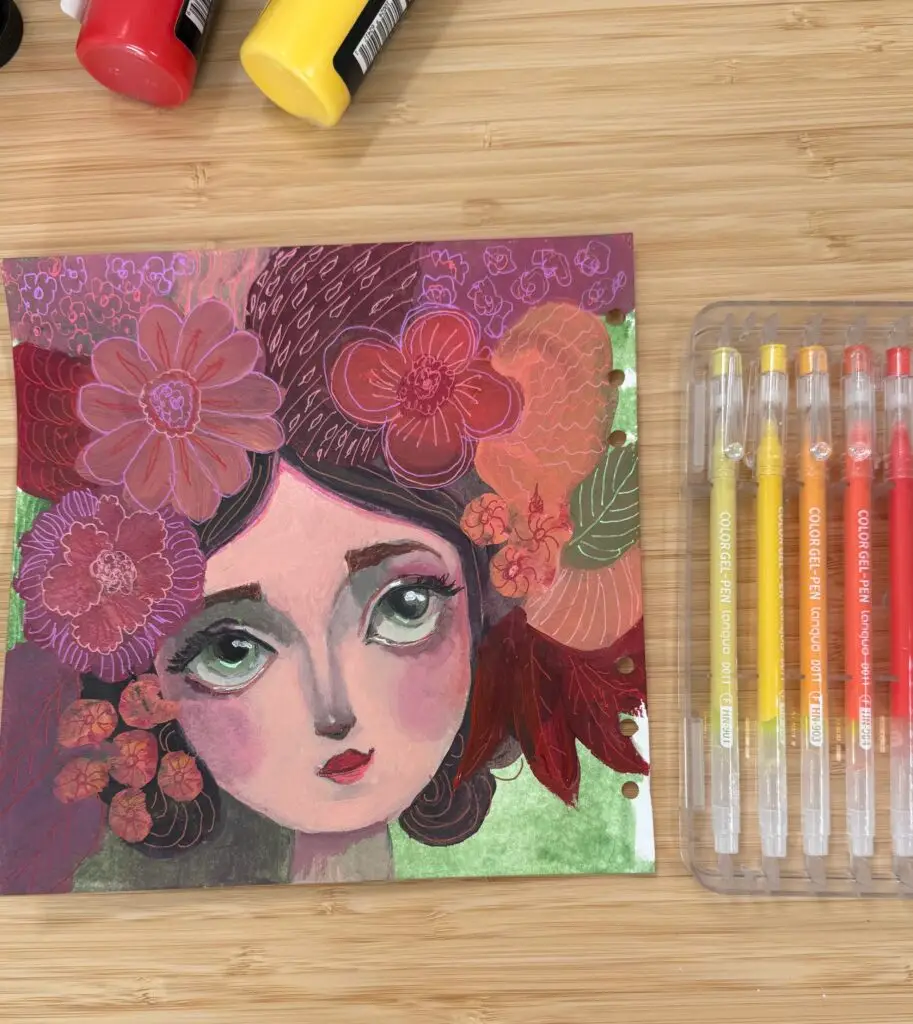
Fall Whimsical Face Project – The Golden Leaf Keeper
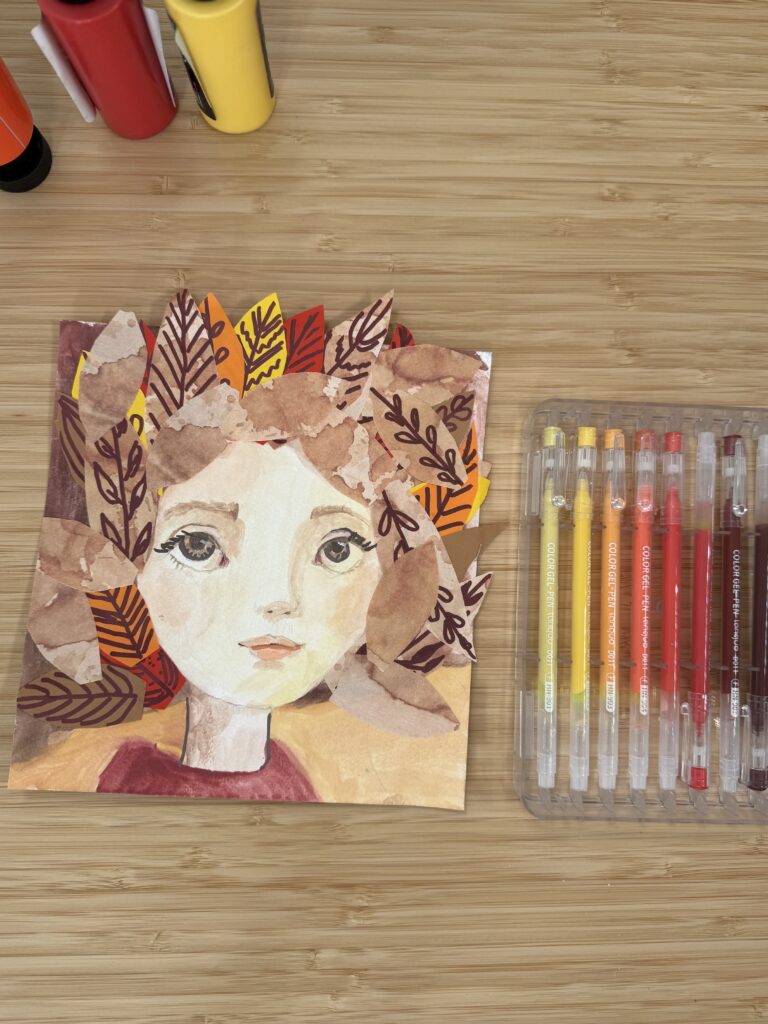
Can you smell that crisp, autumn air? This project is all about celebrating fall.
The rustle of colorful leaves, the warmth of a chunky sweater, and the gentle, golden light that makes everything look magical.
We’re going to create a “Rustic Poet,” a whimsical face full of earthy charm and quiet wisdom. We’ll play with a rich, cozy palette of burnt orange, mustard yellow, and deep burgundy, and give her a crown of twisting vines and autumn leaves.
So, grab your coziest colors and a warm drink. Let’s create a character that’s as comforting and beautiful as your favorite fall day
Mood & Color Palette
Mood: Cozy, nostalgic, earthy and wise.
Color Combo: Rust, mustard yellow, plum, and warm brown.
Step-by-Step Guide
1.In the background, create soft muted orange color.
2.Create the Whimsical Face: Draw the eyes half-closed or looking softly to the side to give her a thoughtful, cozy feeling.
3. Build Warm, Earthy Skin Tones: Use tea-stained browns, diluted rust, and muted orange to create shadow and depth on the face, especially around the eyes and under the cheekbones.
4. Weave an Autumn Tangle for Hair: Turn the hair into a cascade of autumn leaves and branches. Use Mixed Media for Depth: This is the perfect project for collage! Tear a piece of an old book page or colored paper in orange brown and yellow and glue it around the head. This adds incredible texture and a sense of history.
Common Mistakes When Drawing Whimsical Faces (And How to Fix Them)
Mistake #1: Overcomplicating the Face
Fix: Keep facial features simple. The magic of the whimsical faces is in the decorative elements, not realistic proportions.
Mistake #2: Using Too Many Colors
Fix: Stick to a seasonal palette of 3-5 main colors for cohesion.
Mistake #3: Fear of Imperfection
Fix: Whimsical art celebrates wonky lines and asymmetry. Let go of perfection.
Mistake #4: Skipping the Sketch
Fix: Always start with a light pencil sketch, even if it’s just basic shapes.
Mistake #5: Not Letting Layers Dry
Fix: Be patient with watercolor and acrylic. Let each layer dry completely before adding details.
FAQs: Your Whimsical Drawing Questions, Answered!
Don’t see your question here? Just send me an email, and I’ll be happy to help!
Q: I’m a total beginner and can’t even draw a straight line. Is this really for me?
A: Absolutely, and welcome! This is the perfect place to start. Whimsical drawing is all about embracing wonky lines and imperfect shapes. In fact, straight lines are rarely needed! The charm comes from the playful, hand-drawn feel, so your “mistakes” will only add more personality.
Q: I get stuck on the faces. How can I make them look expressive but not creepy?
A: This is a common worry, and the secret is simplicity! Stick to simple eyes and a small curved line for a smile. Avoid adding too many details, and you’ll avoid the “creepy” valley.
Q: I loved the seasonal projects! Can I use the same steps but use different themes?
A: I’m so glad you enjoyed them! And please, YES! That’s a fantastic idea. The steps are a framework you can adapt for anything. Want to draw a mermaid? Use ocean blues and greens and add seashells to the hair. A galaxy fairy? Use deep purples and blues with star freckles. Go for it!
Q: I’m afraid of ruining my drawing when I add color. Any tips?
A: This is such a common fear! My best advice is to:
1. Start with light pencil lines.
2. Do a color test on a separate scrap of paper first.
3. Remember, watercolor is forgiving! You can lift some color up with a damp brush if you make a “mistake,” and often it just becomes a lovely, soft texture. Embrace the happy accidents! with acrylic paint you can paint over the mistakes.
Q: How can I develop my own whimsical style?
A: Your style will naturally emerge as you play! Start by following the tutorials closely, then begin to tweak one thing you love. Maybe you always draw a certain type of eye, a specific hair shape, or unique patterns. The more you draw, the more those consistent, personal quirks will become your signature style. Just keep creating

Conclusion: Your Year-Round Whimsical Journey Awaits
You now have the blueprint for creating beautiful, seasonal whimsical art. The key is to practice the base face until it becomes second nature, then give yourself permission to play with colors, patterns, and themes.
I’d love to see your creations! Share your seasonal whimsical faces on Instagram and tag me @artfulhaven or use the hashtag #SeasonalWhimsicalFaces to connect with a community of like-minded artists.
Ready for more inspiration?
Explore my blog on How to Draw Whimsical Faces Step By Step or dive deeper into Drawing and Painting Whimsical Faces workshop
GRAB YOUR FREE WHIMSICAL FACE PROPORTIONS GUIDE
This guide helps you draw regular female proportions as well as whimsical ones.
Happy Creating,
Salwa