THE ULTIMATE GUIDE TO DIY CHRISTMAS CARDS AND ART JOURNALS
Scrolling through Instagram, I couldn’t help but pause at all the beautiful handmade holiday cards appearing on my feed, some were layered textures, playful trees, winter characters, and thoughtful details. It inspired me to ask: why not try making a DIY Christmas card myself?

After trying many of these techniques, I quickly learned something important. Some ideas failed completely. Some looked easy but were surprisingly tricky. And others looked complicated at first, yet turned out to be the most fun and effortless ones of all, and quickly became my favorites.
Through lots of playful trial and error, these are the techniques that truly stood out. They’re simple, forgiving, and incredibly versatile. These techniques are perfect for both handmade holiday cards and cozy art journal pages. These are the ideas that flow easily, adapt to your own style, and invite creativity without pressure… the kind that make you want to keep creating.
So pull out your paints, your paper scraps, that washi tape roll you’ve been hoarding (no judgment here!), and let’s turn this space into a holiday wonderland.
Little Trees, Big Joy: Creative Christmas Tree Ideas
One Tree Shape, Endless Possibilities: An Easy Holiday Card Technique
There are so many beautiful and playful ways to draw a Christmas tree, and the best part is that they can all start with the simplest idea. For this technique, we’ll create a tree shape and use it in two creative ways.
Begin by drawing a triangle on a piece of cardboard. Carefully cut it out so you have both the tree shape and the empty cutout left behind. We’ll be using both of these as part of the design:
one as the tree itself
and the other as a framing space for marks, patterns, and color.
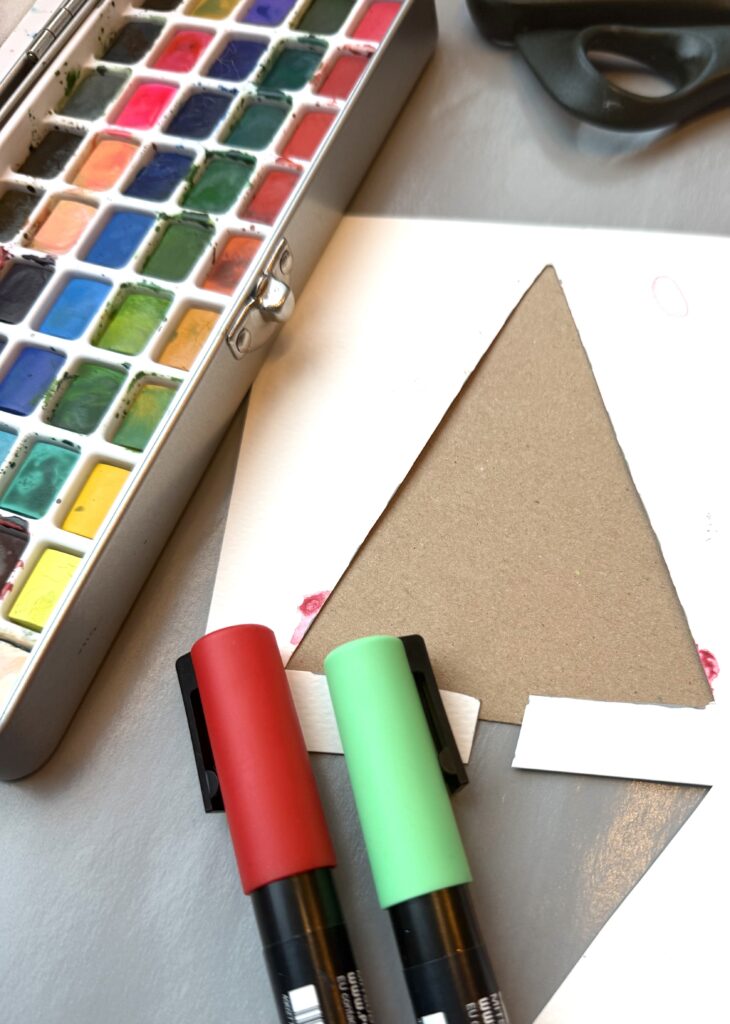
If cutting feels tricky, don’t worry at all. Simply draw the triangle very lightly on your card or paper and use it as a gentle guide. This is meant to feel easy and relaxed. There’s no need for perfect edges or precision. Let the process stay playful and enjoyable
going down lines -Inside-the-Shape Christmas Tree
Start by cutting a simple tree shape out of cardboard. Place the cardboard on your paper so the tree-shaped opening becomes your guide or draw a triangle on your paper.
Paint short strokes starting from the top center, moving outward to the left and right as you work your way down. Let your lines touch the cardboard edges by doing this, the tree shape stays neat without drawing an outline.
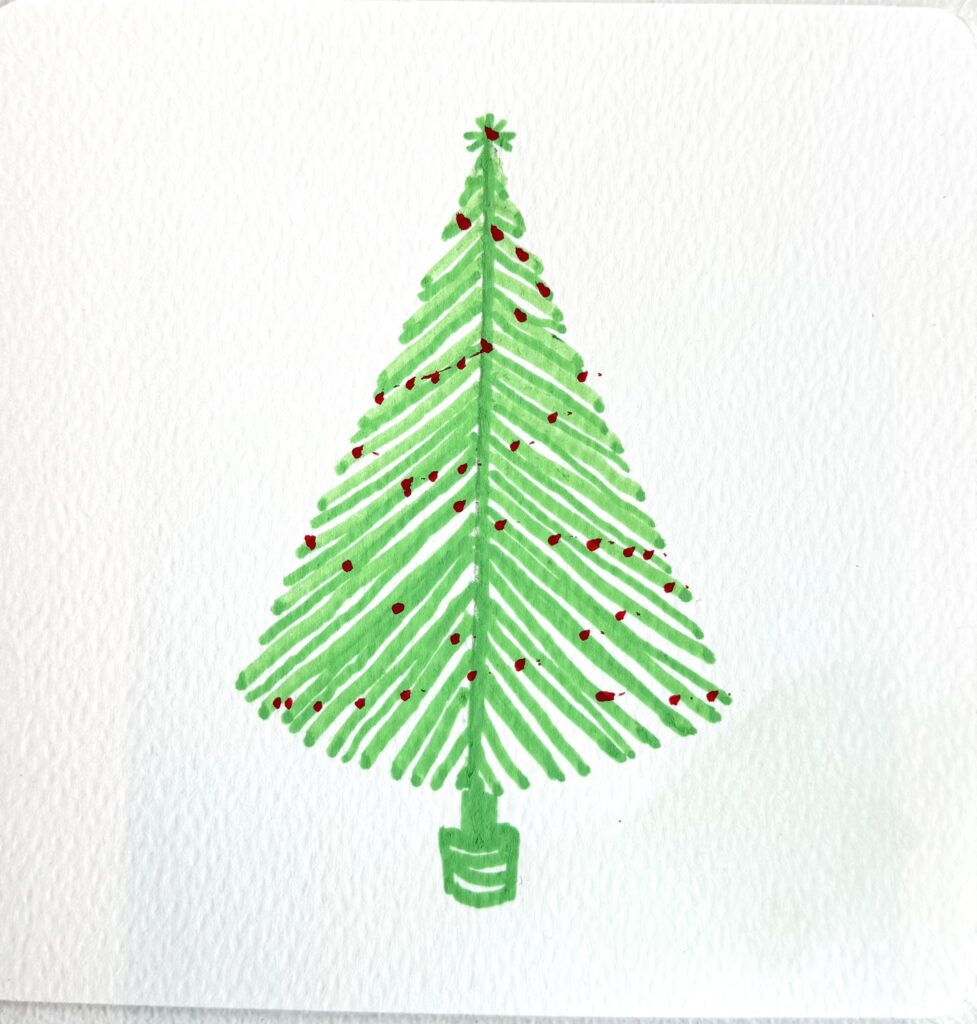
Keep adding longer strokes as you move downward to build the branches. When you’re done, lift the cardboard to reveal a clean tree shape.
Finish with a few dots for ornaments and a small trunk at the bottom.
Simple, playful, and perfect every time.
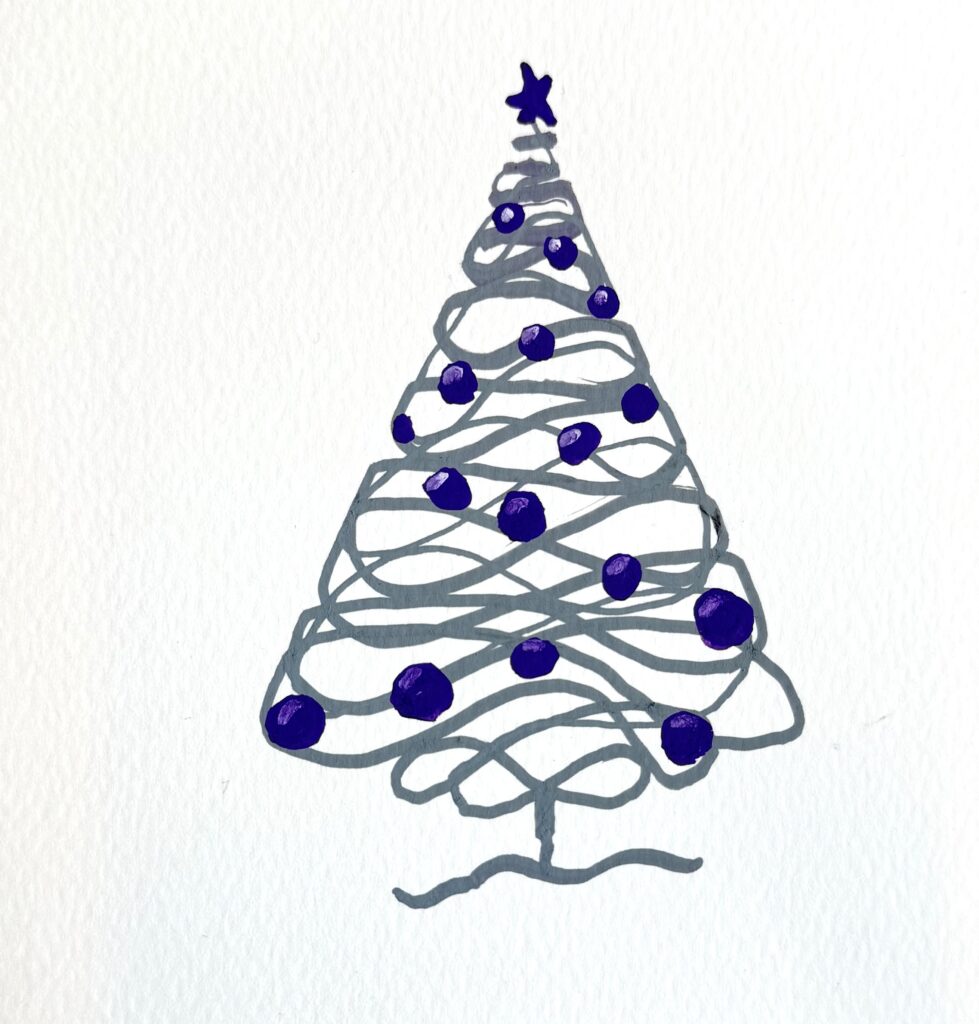
Scribble Christmas Tree
Use your cut out or lightly draw a triangle shape to guide your tree. Inside that space, freely scribble lines using one or more colors, looping, crossing, and overlapping as much as you like. Start at the star point and just… scribble. A happy, zigzaggy, widening scribble all the way down. It’s not perfect, it’s full of joy. Top it with a tiny gold star sticker because why not?
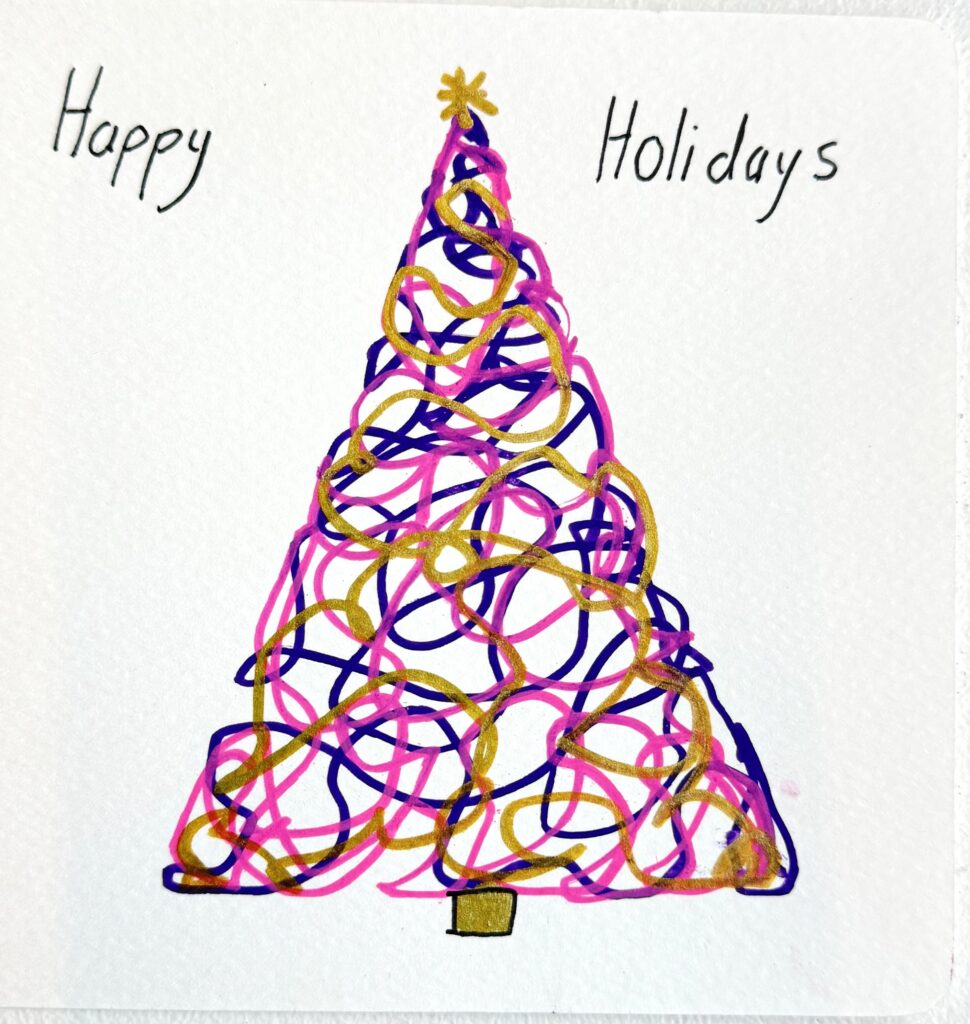
Finish by writing a short holiday message around the tree.
Loose, playful, and full of joy
White-on-Black Scribble Tree
You can do the same technique as the above Christmas tree but this time change the color of the cardboard to black and the scribbles in white or silver or gold. Start by using the cut out or by lightly sketching a triangle shape. Using a white pen or silver pen fill the shape with loose, overlapping loops and scribbles.
Let the lines overlap freely and build density toward the bottom. Add a small star on top and a tiny trunk underneath.
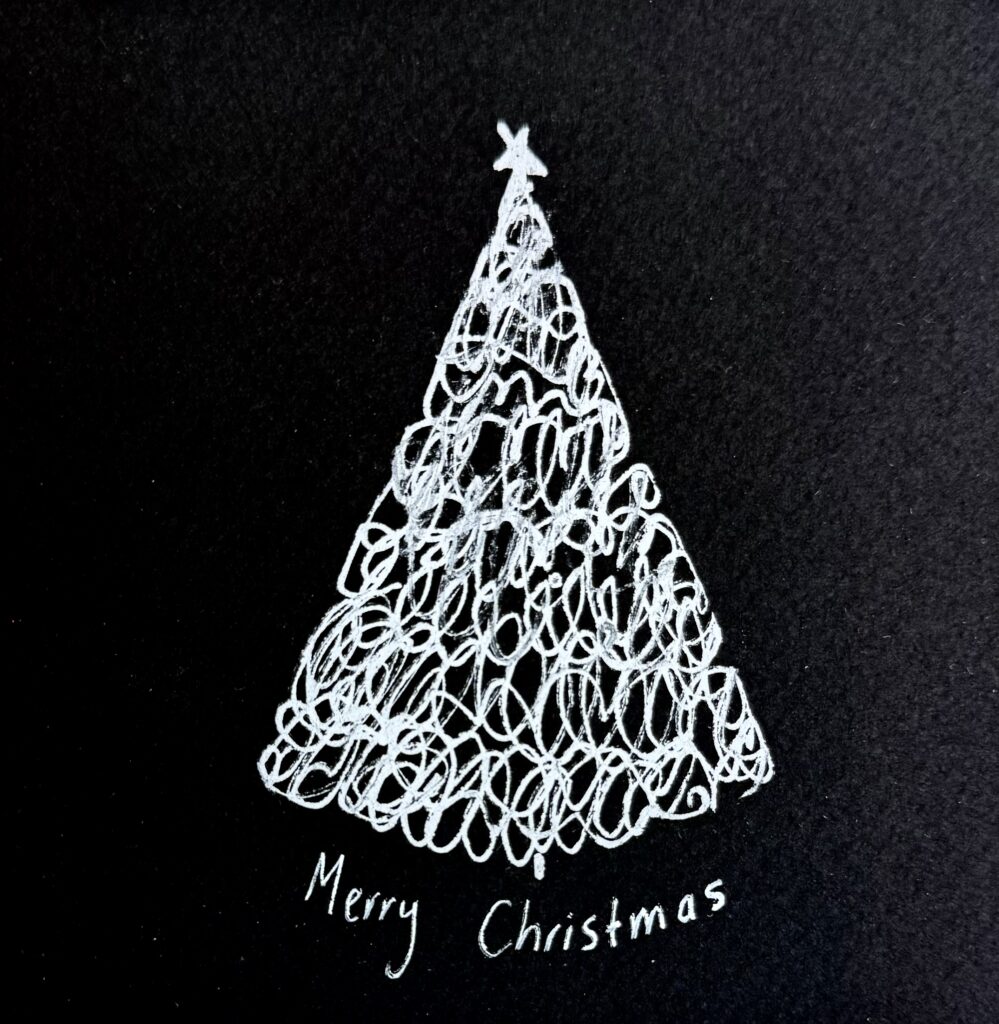
Finish with a simple holiday message below.
Bold, playful, and beautifully graphic
Single-Line Loop Tree
Draw or imagine a triangle shape to guide your tree or use the cut out you made. Using one continuous line, loop back and forth from the top to the bottom, letting the line naturally widen as it goes down.
Keep the movement loose and flowing. Try not to lift your pen. When the triangle feels filled, add a small trunk and a simple star on top.
Finish by dotting ornaments across the lines.
Minimal, modern, and wonderfully relaxing.
Patterned Stroke Christmas Tree
Draw or imagine a triangle shape as your guide or use your cut out. Starting at the top, fill the space with short vertical strokes, working in rows from top to bottom.
Leave small gaps between the rows so the pattern can breathe. You can alternate colors to create a playful rhythm.
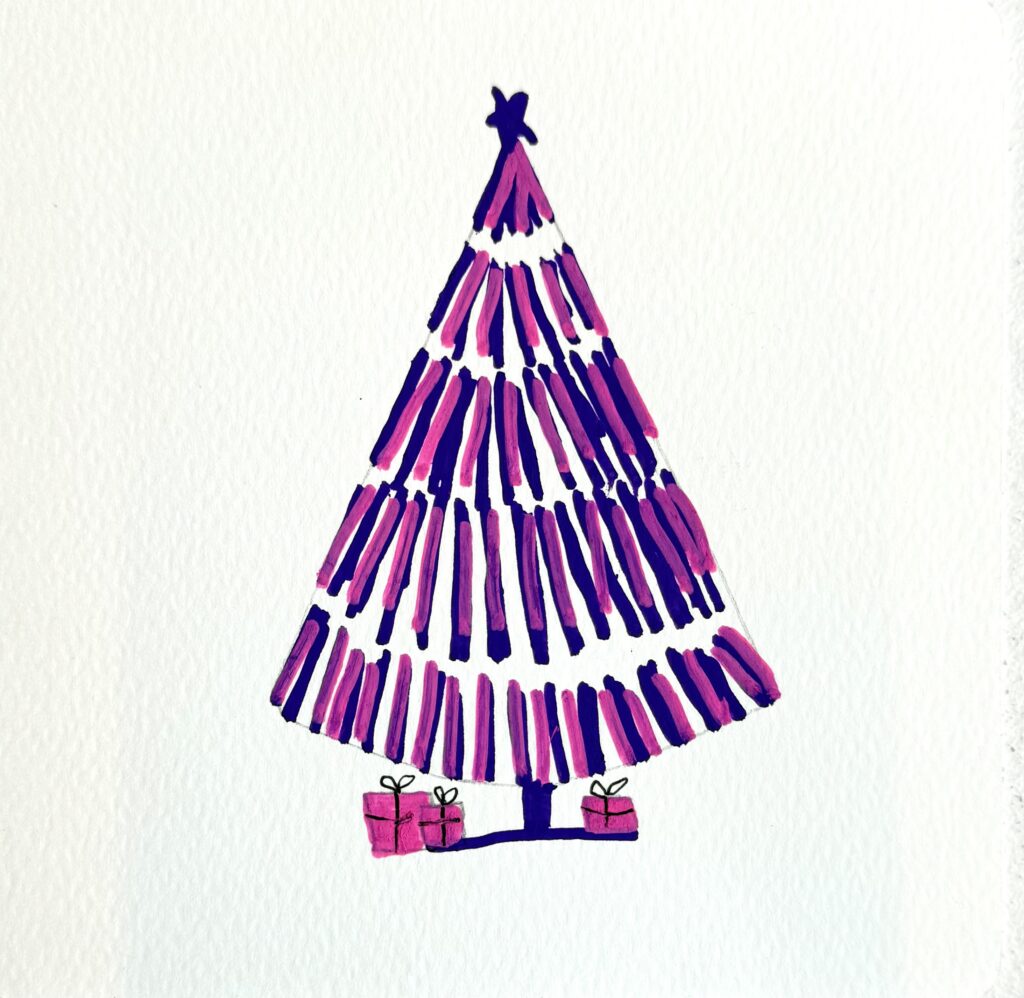
Finish with a simple star on top, a straight trunk, and a few small gifts at the base.
Graphic, festive, and beautifully simple
Layered Evergreen Stroke Tree
Use the cut out or lightly sketch or imagine a triangle shape to guide your tree. Starting at the center, draw short upward strokes, layering them outward to build the branches.
Work in sections from top to bottom, letting each layer grow wider as you go. Use a darker green near the center and lighter green toward the edges for depth.
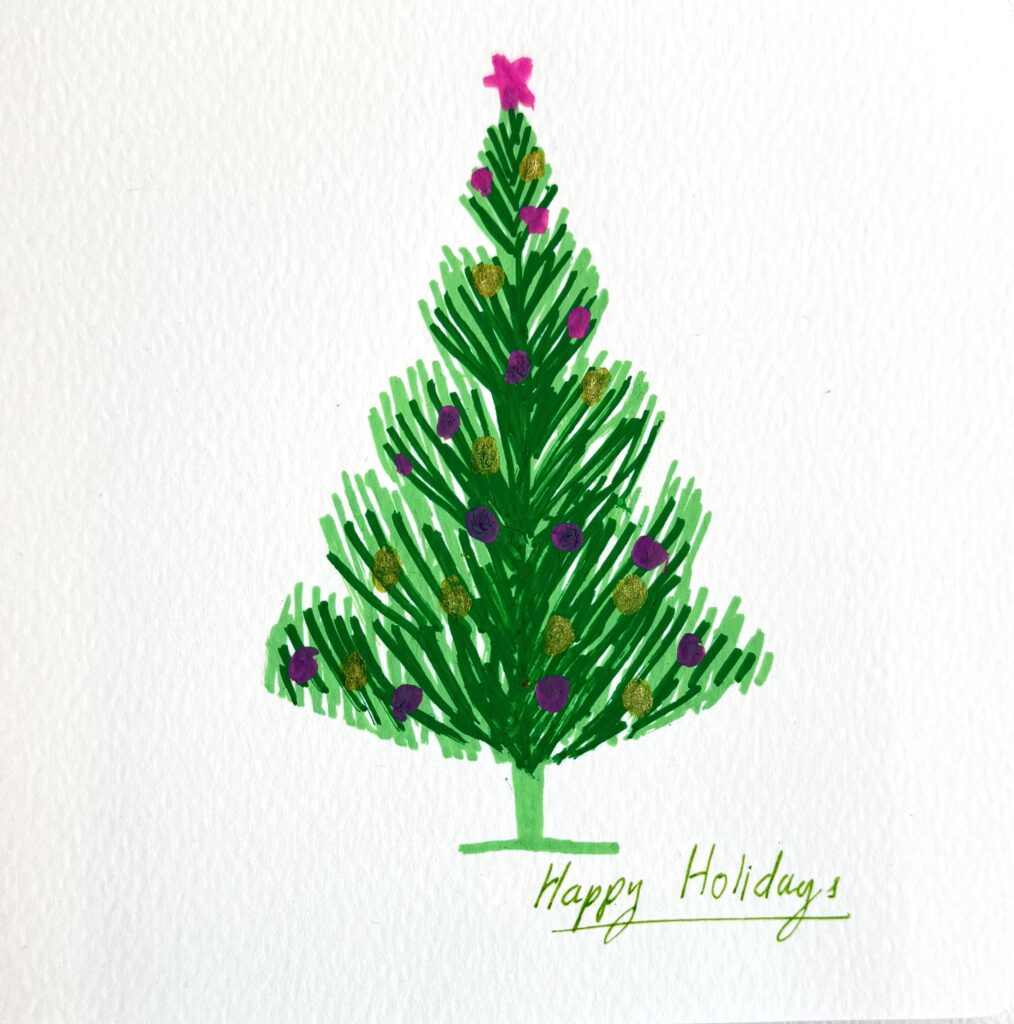
Add small dots for ornaments, a star on top, and a simple trunk at the bottom.
Classic, cozy, and easy to repeat 💚
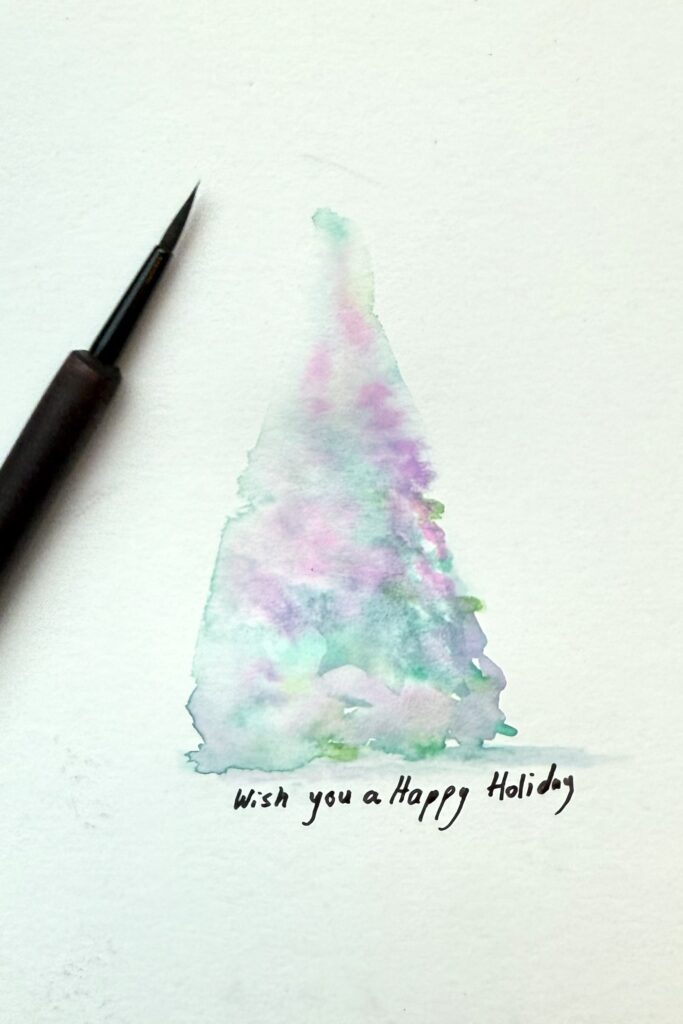
The Dreamy Watercolor Tree
Wet your watercolor paper with clean water in a loose triangle shape. Then, with a happy sigh, drop in sap green, a touch of teal, and maybe a whisper of deep blue. Watch them dance and blend all on their own. The magic word here is let go.
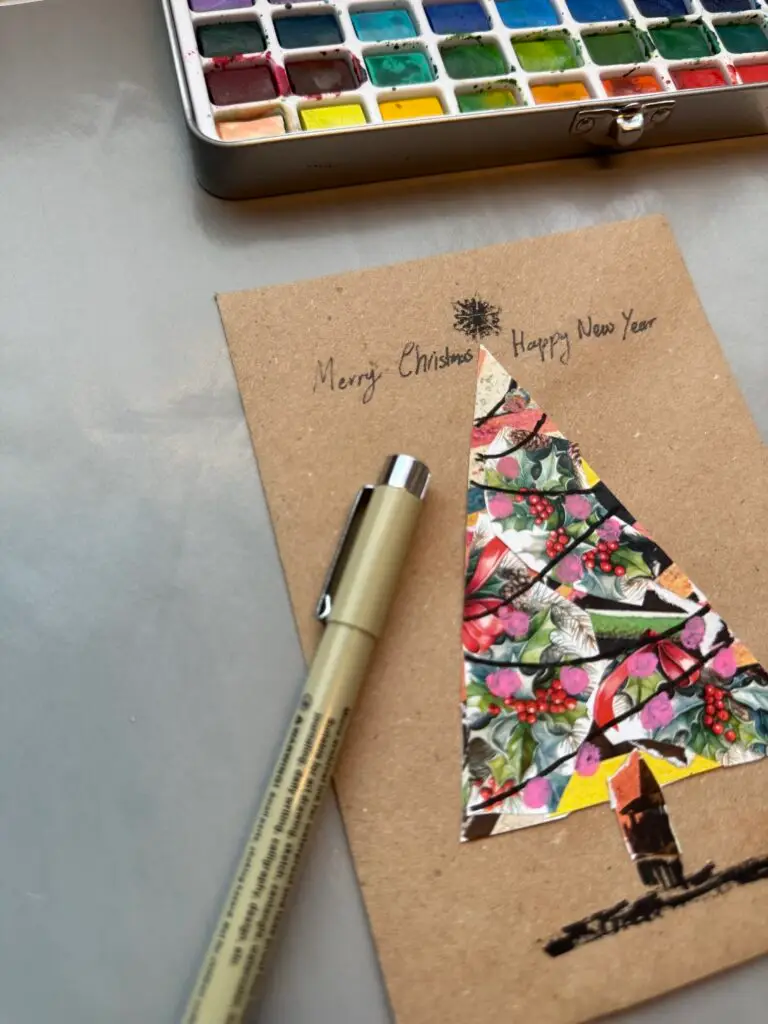
The Cozy Collage Tree
Dig into your paper stash and bring your tree shape to life. Take the cardboard tree you’ve cut out and use it as your base. Tear (yes, tear!) strips of green patterned paper, book pages, or washi tape, and layer them directly on top of the tree shape, starting with smaller pieces near the top and gradually using longer ones toward the bottom.
Let the papers overlap, tilt, and feel imperfect. It is that texture what makes it special. Once your tree is fully covered, glue it onto the front of your card. Just like that, you’ll have a warm, folk-art–style Christmas tree full of depth, charm, and handmade character.
Triangle Trees
Gather a mix of papers such as plain or patterned (patterned adds so much charm here) and cut out tall triangle shapes. Each one becomes its own little tree. Make a few, make many, and move them around on your card until the arrangement feels right.

A gentle tip: odd numbers often create a more natural balance, and three trees together almost always feel just right. There’s no strict rule, it’s simply one of those quiet design tricks that shows up again and again in art
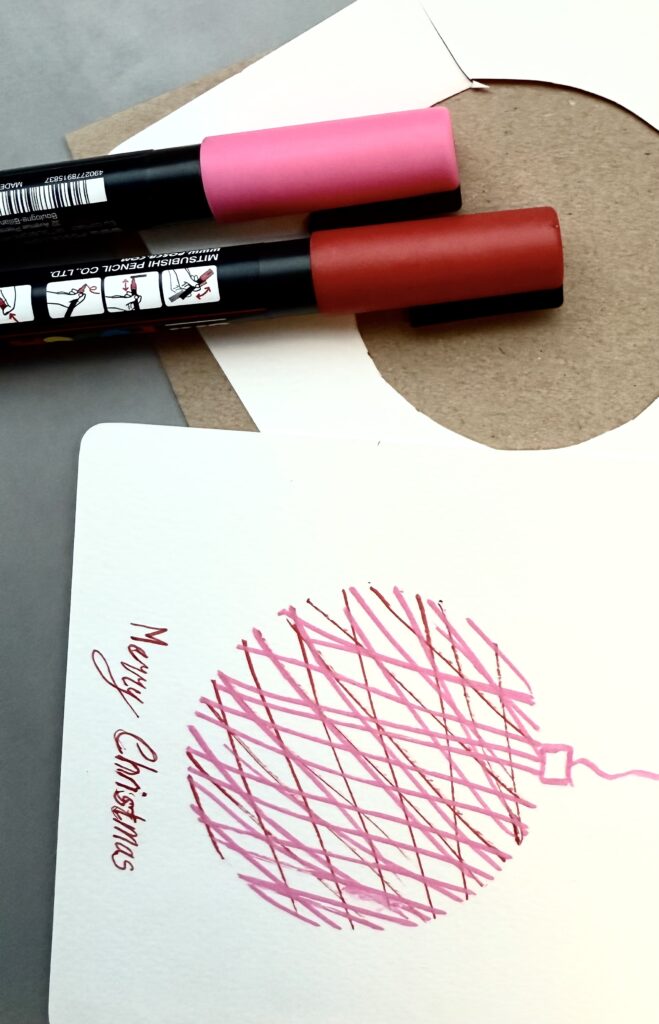
Playing with Ornament Silhouettes
Ornaments are little circles of joy, they are perfect for experimenting with shine, patterns, and playful details. We can use the same simple technique as the Christmas tree to create them. Cut out a circle (or several circles in different sizes) and keep both the circle itself and the empty space it leaves behind. Each one offers a different creative opportunity.
Layer, draw, paint, or collage inside the shape or simply, let the cutout become the focal point on your card. And don’t stop with ornaments: this technique works beautifully for stars, moons, snowflakes, or any shape you feel inspired to explore. Follow your curiosity and let the shapes guide your creativity

Zentangle Ornament Therapy
Draw a circle or use the frame space we created. Now, fill it with little lines, dots, swirls, waves… let your pen mindlessly repeat a pattern. It’s art and meditation.
The “Ooh, It’s 3D!” Trick
Paint a simple circle with watercolor. Before it dries, take a slightly damp brush and lift a tiny dot of color from the upper left corner. Or, after it dries, add a dot of white gel pen there. On the opposite side go over the corner with a little darker color. Poof! It’s a shiny 3D Ornament.

The Hanging Ornaments:
Lightly draw a group of circles some big some small make the overlap. Draw 3/4 of a circle or 1/4 of a circle. then add straight line on top add details. Instant festive composition!
Stamped Gift Stack Card
Use a small square stamp and dip it lightly into ink or paint. Stamp one square at a time, letting the texture stay uneven and imperfect.
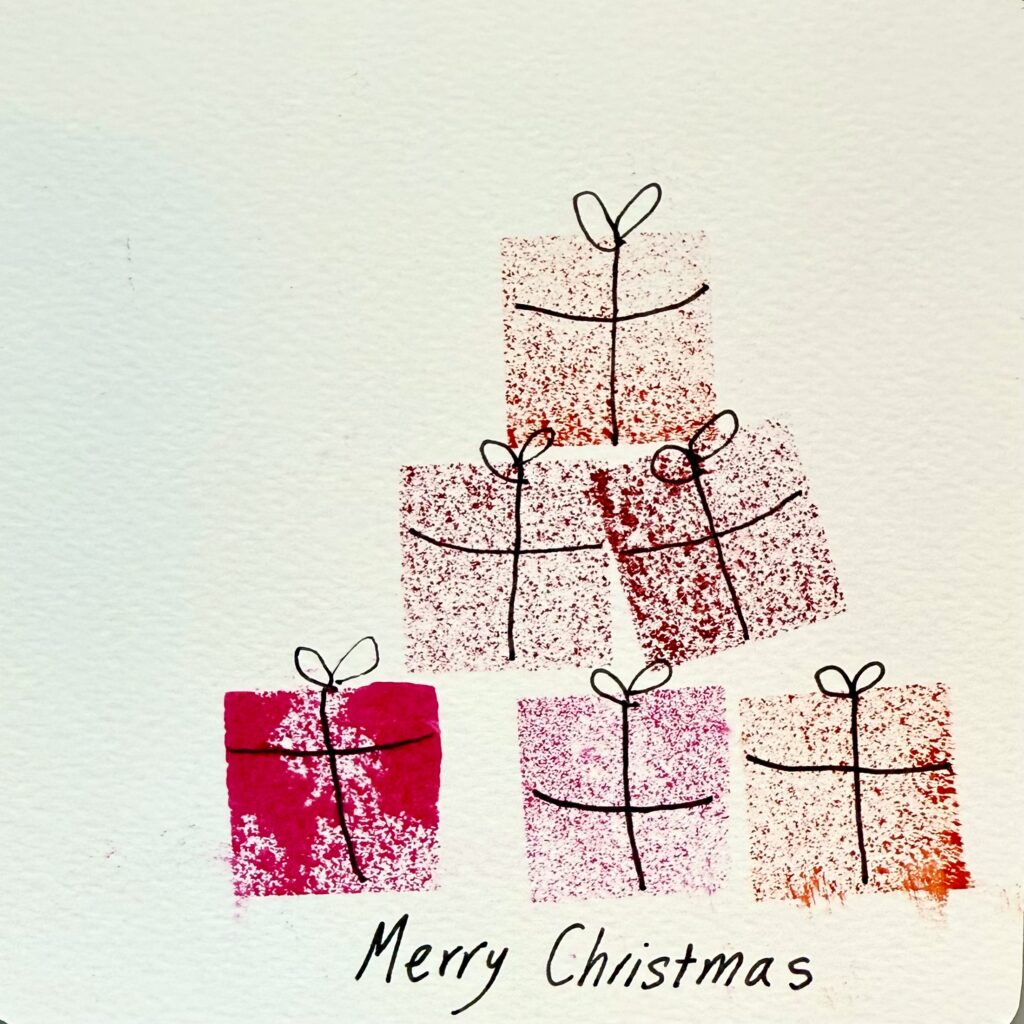
Build a simple stack by placing one square on top and two or three below to form a tree-like shape. Vary the colors for a playful look.
Once dry, draw a single vertical line and a curved horizontal line on each square to suggest ribbon, then add a small bow at the top.
Finish with a handwritten holiday message underneath.
Easy, festive, and perfect for handmade cards
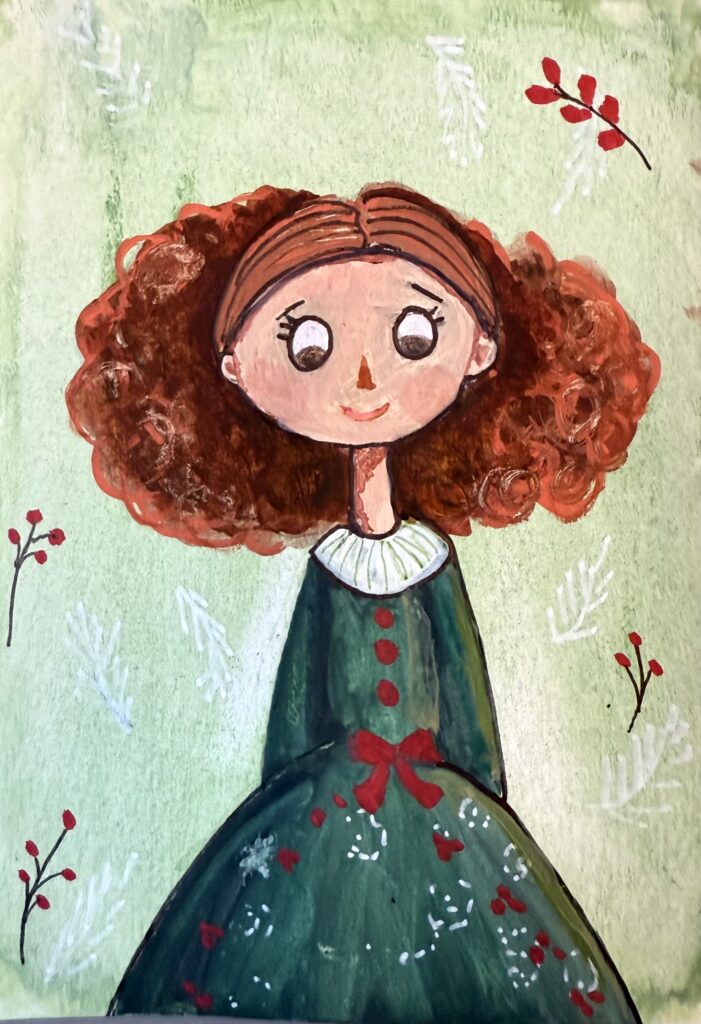
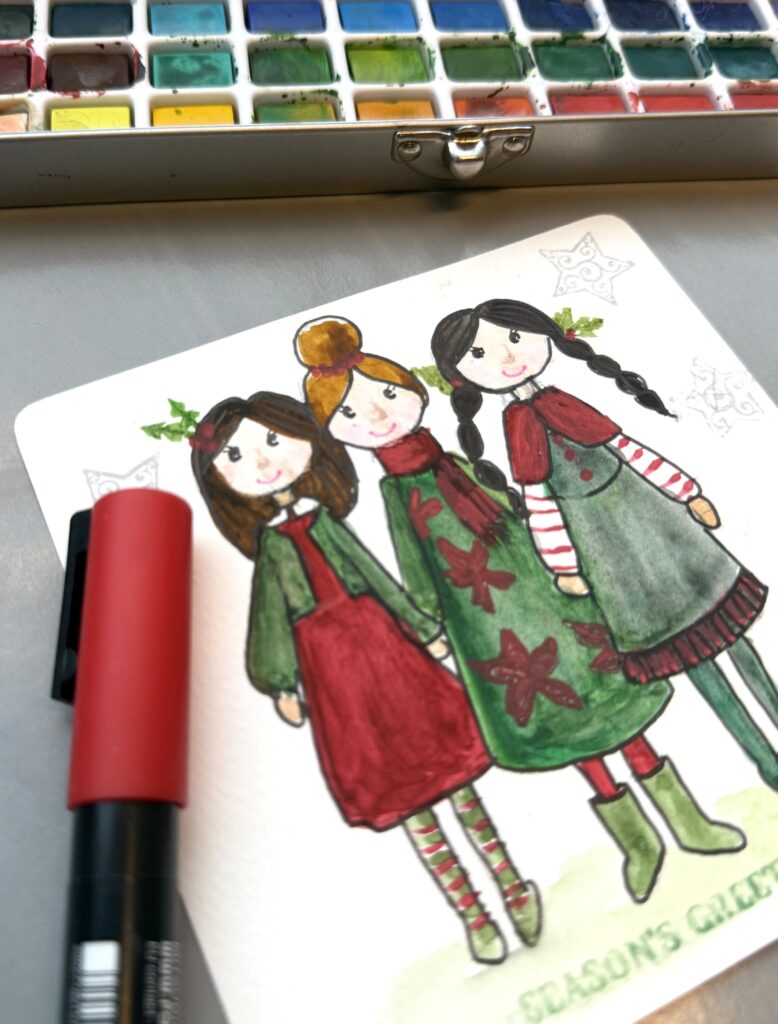
Whimsical Winter Friends
You can use the Whimsical Dolls to create wintery scenes.
Make three dolls holding hands and wearing Christmas outfits of green and red. Add details like stars and snow flakes.
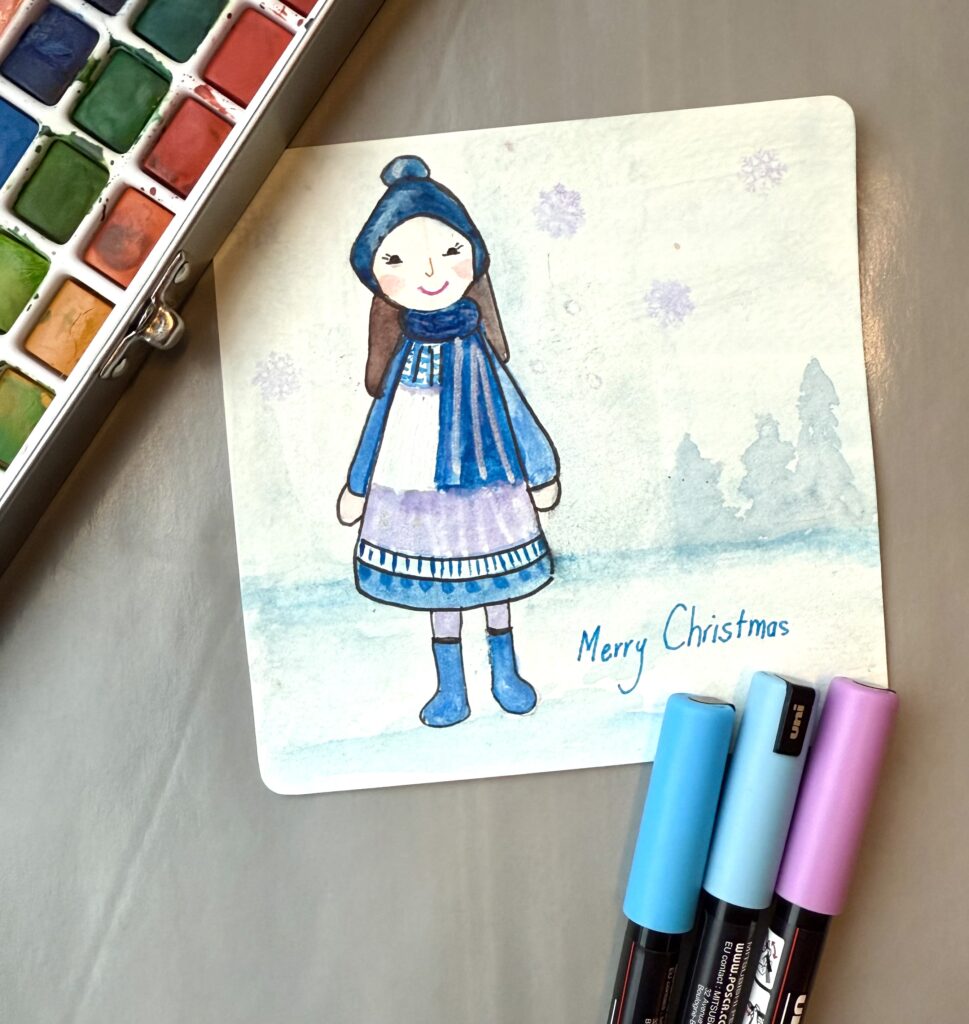
You can make these dolls in a winter wonderland, paint everything in light blue then add a different blues, purples and silver to make the scene shine.
I hope you will try these little art projects and remember, my friend, there are no mistakes here, only happy little accidents and unique beauty.
Your handmade card is a whisper of your heart in an envelope. That is the truest magic of the season.
Now, I’d love to see what you make! Please share your work! tag your creations with #ArtfulHaven so I can find them and celebrate with you! or send me and email at [email protected].
With love,
Salwa
P.S. Put on some holiday tunes, light a cinnamon candle, and let this be your peaceful creative time. You deserve it.